Building an autonomous, self-healing device service at scale: the story of Intility Client Health
With the ever-growing complexity of managing enterprise Windows client environments, we looked for a way to programmatically deliver maintenance to all. We believed a problem solved on one device should help fix the next. This raised the question; how could we make the maintenance experience from one device positively affect all others? This article gives a brief introduction to the development process of Intility Client Health.
Introduction
Intility employs many systems and practices to help ensure a stable user experience. From device configuration, ensuring management agents are functioning and up to date, to addressing maintenance and security needs. However, we often see that due to the uniqueness of each device and its users workflow, certain devices fall behind for their maintenance needs. Some lack security updates, while others have problems installing applications or logging in to the device, to name a few. This can cause underlying issues that reduce the overall user experience. The reason behind these underlying issues are often difficult to predict or prevent, but not impossible to do something about. After taking inspiration from a project by Anders Rødland, we decided to take on the challenge of securing the health of all our managed devices.
The start of Intility Client Health
Intility Client Health (ICH) started out as an extensive PowerShell script that aimed to address and troubleshoot client scenarios we were familiar with from other devices' past experiences. Running silently in the background on all Intility managed devices, it was built with low local resource consumption by design. The script for Intility Client Health is written in PowerShell, and with its native integration with Windows we could ensure that ICH would run as expected without worrying about any prerequisites. The syntax was also intuitive, making it highly accessible for technicians to learn, adopt and collaborate with.
Drawing on our internal knowledge database, previous support tickets and other data points from our management systems, we had all we needed to get started. As this data contained detailed information on problems and deviations for specific devices, we started creating automation tasks to identify and remedy the very same problems and deviations on all other devices.
The Intility Client Health script
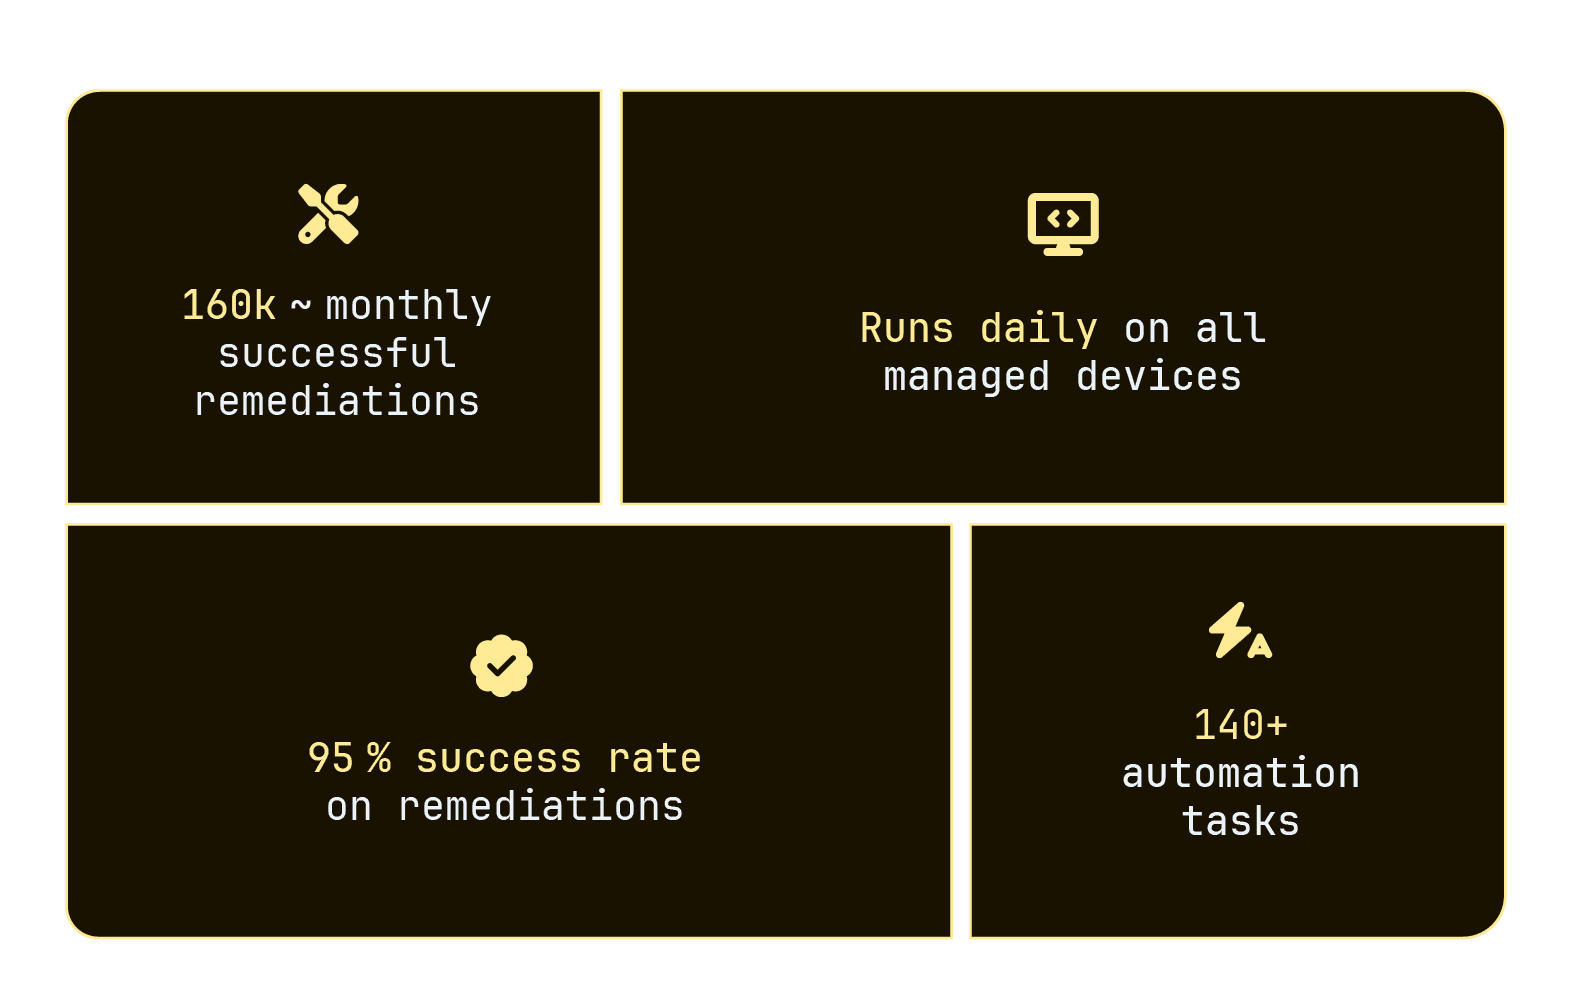
After a few years of development, the ICH script now consists of over 11.000 lines of code containing over 140 automation tasks covering a wide range of topics:
- Configuration of agents and services like Splunk, Lansweeper, Cisco AnyConnect and Citrix Workspace
- BitLocker and Secure Boot configuration
- Hardware health check for battery and hard drives
- Internal Windows components like BITS, Windows Update, Antivirus, Group Policy, AppLocker, Certificates, DCOM and required Windows services
- Windows Build Upgrade on clients running end-of-life Windows Builds
- ConfigMgr (Software Center) and Intune (Company Portal) components
When Intility Client Health is triggered, it starts by running an initialization function that performs a couple of different tasks:
- Verify and set encoding for the logfile to make sure it is in UTF-8
- Check if ICH is not already running to avoid duplicate runs at the same time
- Request a mutex to avoid interfering with other automated tasks deployed by Intility
- Set values in Windows Registry for script startup time, version and process id
- Verify the integrity of WMI and repair it if broken, as many of our tests and remediations are dependent on this feature
- Set all global variables:
- Management: AD type, ConfigMgr/Intune, domain status and site code
- Machine information: virtual/physical, manufacturer, model and serial number
- Internet connection status: internet, ICH resources and management
To trigger the automation tasks, we created a "runbook" which considers your device configuration and decides the order of tasks to execute. The Runbook provides a valuable overview of how and when tasks are executed, with the flexibility to change which tasks to execute and their respective order. After initializing, the runbook is triggered and tests run based on the global variables set, as shown in this snippet from the runbook:
if ($Global:NetworkConnection.validInternetConnection) {
    if ($Global:NetworkConnection.validResourceConnection) {
        Test-WindowsBuildUpgrade
    }

    Test-WindowsUpdate

    if ($Global:ClientManagement.HybridJoined -eq $false) {
        Test-WindowsLicense
    }
}

if ($Global:NetworkConnection.validManagementConnection) {
    Test-BitLocker
}
When running ICH everything is logged to a file in JSON format. A typical detection log event will look like this:
 "Timestamp": "2024-01-11T10:44:32.365",
  "LogLevel": "Warning",
  "LogSource": "Test-ActiveAntivirus",
  "Message": "Windows Defender is the active antivirus, but is out of date.",
  "Remediation": "Running Update-WindowsDefender.",
  "ManualRemediation": "",
  "ScriptVersion": "2.16.6",
  "JobId": "97906278-dda4-9219-b8e3-1ed258a62acd",
  "EventId": "827w6281-j21h-9j5f-o21p-99k72gr7hu2k",
"EventChainId": "6291d556-51fb-4fb5-3o54-3b753b1b2b0a"- Timestamp --------- contains the date and time of this specific event
- LogLevel ---------- severity of the log event
- LogSource --------- includes which module in ICH that created the event
- Message ----------- contains relevant information to the event
- Remediation ------- details what remediation steps that will automatically be taken
- ManualRemediation - details what remediation steps that must be manually performed
- ScriptVersion ----- shows the version of ICH that is running when the event was created
- JobId ------------- a unique ID used for every event during a run of ICH
- EventId ----------- a unique ID just for this event
- EventChainId ------ a unique ID used to connect all events related to each other togetherIn order to maintain an organized project structure, we decided to categorize the automation tasks into two main groups with tailored design templates as base code: Detections and Remediations.
The Detection
A detection task, also referred to as a "Test", looks for specific information, deviations, or problems. This can be anything from error codes, specific log events, missing files, faulty configurations, BIOS setup or Windows Updates, to name a few.
Below is an example of what our detection of SecureBoot events looks like:
$SecureBootEnabled = Confirm-SecureBootUEFI -ErrorAction Stop
if ($SecureBootEnabled -eq $false) {
  if ($Global:MachineInformation.Manufacturer -in 'LENOVO', 'HP', 'Hewlett-Packard', 'DELL', 'Dell Inc.') {
      $LogMessage = "Device has $BIOSMode boot enabled, but does not have Secure Boot enabled."
      $RemediationMessage = "Running Enable-SecureBoot -Manufacturer $($Global:MachineInformation.Manufacturer)"
      Write-CustomLog -LogLevel Warning -Message $LogMessage -Remediation $RemediationMessage

      switch ($Global:MachineInformation.Manufacturer) {
          'LENOVO'          { Enable-SecureBoot -Manufacturer LENOVO ; return }
          'DELL'            { Enable-SecureBoot -Manufacturer DELL   ; return }
          'Dell Inc.'       { Enable-SecureBoot -Manufacturer DELL   ; return }
          'HP'              { Enable-SecureBoot -Manufacturer HP     ; return }
          'Hewlett-Packard' { Enable-SecureBoot -Manufacturer HP     ; return }
      }
  }
}
The Remediation
A remediation task, also referred to as a "Resolve", consists of one or more ways to solve a detection. These tasks are usually specific to each detected event, but can in some cases be reused by multiple detection events, such as remediation of any Windows service through our Resolve-Service remediation task. These tasks return a result after attempting to resolve the detected event, being either success, failed or pending if a reboot or replication time is necessary. This gives us insight into how effective our remediations are at resolving specific detections, allowing us to upgrade or change remediations to increase the rate of success.
Below is an example of what our SecureBoot remediation for Dell looks like:
if ($Manufacturer -eq 'DELL') {
    try {
        $DellBiosAttributeInterface = Get-WmiObject -Class 'BIOSAttributeInterface' -Namespace 'root\dcim\sysman\biosattributes' -ErrorAction SilentlyContinue
        if ($DellBiosAttributeInterface) {
            $EnableSecureBootResult = $DellBiosAttributeInterface.SetAttribute(0, 0, 0, 'SecureBoot', 'Enabled')

            $Result = switch ($EnableSecureBootResult.Status) {
      		0 { 'Secure Boot was enabled. This will not take effect until client is rebooted.' ; $LogLevel = 'Pending' }
      		1 { 'Failed to enable Secure Boot: Unspecified error.'                             ; $LogLevel = 'Failed' }
      		2 { 'Failed to enable Secure Boot: Invalid Parameter.'                             ; $LogLevel = 'Failed' }
      		3 { 'Failed to enable Secure Boot: Access Denied. Most likely bios password.'      ; $LogLevel = 'Failed' }
      		4 { 'Failed to enable Secure Boot: Not Supported.'                                 ; $LogLevel = 'Info' }
      		5 { 'Failed to enable Secure Boot: Memory Error.'                                  ; $LogLevel = 'Failed' }
      		6 { 'Failed to enable Secure Boot: Protocol Error.'                                ; $LogLevel = 'Failed' }
      		default { 'Unable to verify status after attempting to enable Secure Boot.'        ; $LogLevel = 'Failed' }
            }

            Write-CustomLog -LogLevel $LogLevel -Message $Result
      	}
       	else {
            $LogMessage = 'Unable to get Dell WMI-DCOM class to set BIOS attributes. Unable to perform remediation.'
            Write-CustomLog -LogLevel Failed -Message $LogMessage
        }
    }
    catch {
    	$LogMessage = 'Client is missing Dell WMI-DCOM to set BIOS attributes. Unable to perform remediation.'
    	Write-CustomLog -LogLevel Failed -Message $LogMessage

    	$LogMessage = "$($MyInvocation.MyCommand.Name) threw an exception."
    	Write-CustomLog -LogLevel Exception -Message $LogMessage -ExceptionObject $PSItem
    }
}Code Assurance CI/CD
To assist in maintaining and developing the project, we utilize CI/CD through GitLab to:
Spellcheck: A custom job that runs every log line through a check for spelling mistakes
Analyze: PSScriptAnalyzer checks the quality of PowerShell code
Test: Pester test framework for PowerShell runs custom tests on all of our code
Our Pester setup includes custom one-to-one tests (a test for one automation task), as well as general one-to-many (a test for all automation tasks). We primarily use one-to-many tests, as they allow us to create any test/rule that every PowerShell function in the project must adhere to. We leverage this for quality assurance, making sure code and documentation is up to standard as well as compatibility between modules in the project.
Below is an example of a test running on all our functions:
It 'Function must be using try/catch' {
  # Act
  $UsesTry = $RawContent -Match 'try\s?\{'
  $UsesCatch = $RawContent -Match 'catch\s?\{'

  # Assert
  $UsesTry -and $UsesCatch | Should -Be $true
}
Additionally, we have another CI/CD, running on a mirrored instance of the GitLab repository in a separate secure environment. This environment requires special privileges to access and is used to trigger the pipeline responsible for:
Build:
- Release: Builds a large single file PowerShell script from the 140+ individual PowerShell files
- WhatIf: Same as release, but all remediations are deactivated so we can see the impact new functionality will have
CodeSign: Signs the large single file PowerShell script with our CodeSign certificate
Challenges
We encountered several challenges in our journey developing Intility Client Health. Firstly, we realized that using Windows Task Scheduler to run the script, a primary component in our initial strategy, did not fulfill all our requirements and often failed to perform as anticipated. This led to instances where ICH was not executed on time, causing delays and inefficiencies. Furthermore, these scheduled tasks lacked comprehensive logging, making it challenging to pinpoint reasons for non-execution.
Secondly, our initial deployment approach presented a considerable obstacle. We used group policy for Configuration Manager and Win32Lob applications for Intune to deploy the script and a scheduled task to trigger it. This required us to maintain two separate installation procedures that were to operate as if being one. Upgrading and downgrading versions of ICH thus demanded substantial amounts of manual work, which was not only time-consuming, but also increased the risk of human errors. Additionally, it reduced our overall capacity to address other development matters.
Lastly, testing new versions of ICH was challenging, as it was difficult to determine the sufficient level of testing. During the early development stages, we reached out to a select few customers to test new features, but quickly realized the disadvantages of this approach. Given the diversity and complexity in configuration and setup among our customers, it was difficult to determine when a feature had been tested enough to be deemed reliable for deployment to all devices. This led to a lot of manual testing, usually requiring more time than developing the features themselves.
These challenges served as learning opportunities and guided us towards refining our development and deployment processes for ICH. They helped us innovate and adopt more efficient and reliable approaches that would ultimately push the project in a new direction.
Intility Client Health built as a service
Having identified the hurdles we needed to overcome; we knew what the solution had to address. We settled on building the application Intility Client Health Service. It consists of a Windows Background Service that ensures that the ICH script runs on predetermined intervals, keeps the ICH script updated and ensures that certificates and signatures are in order.
How does it work? Let's explain

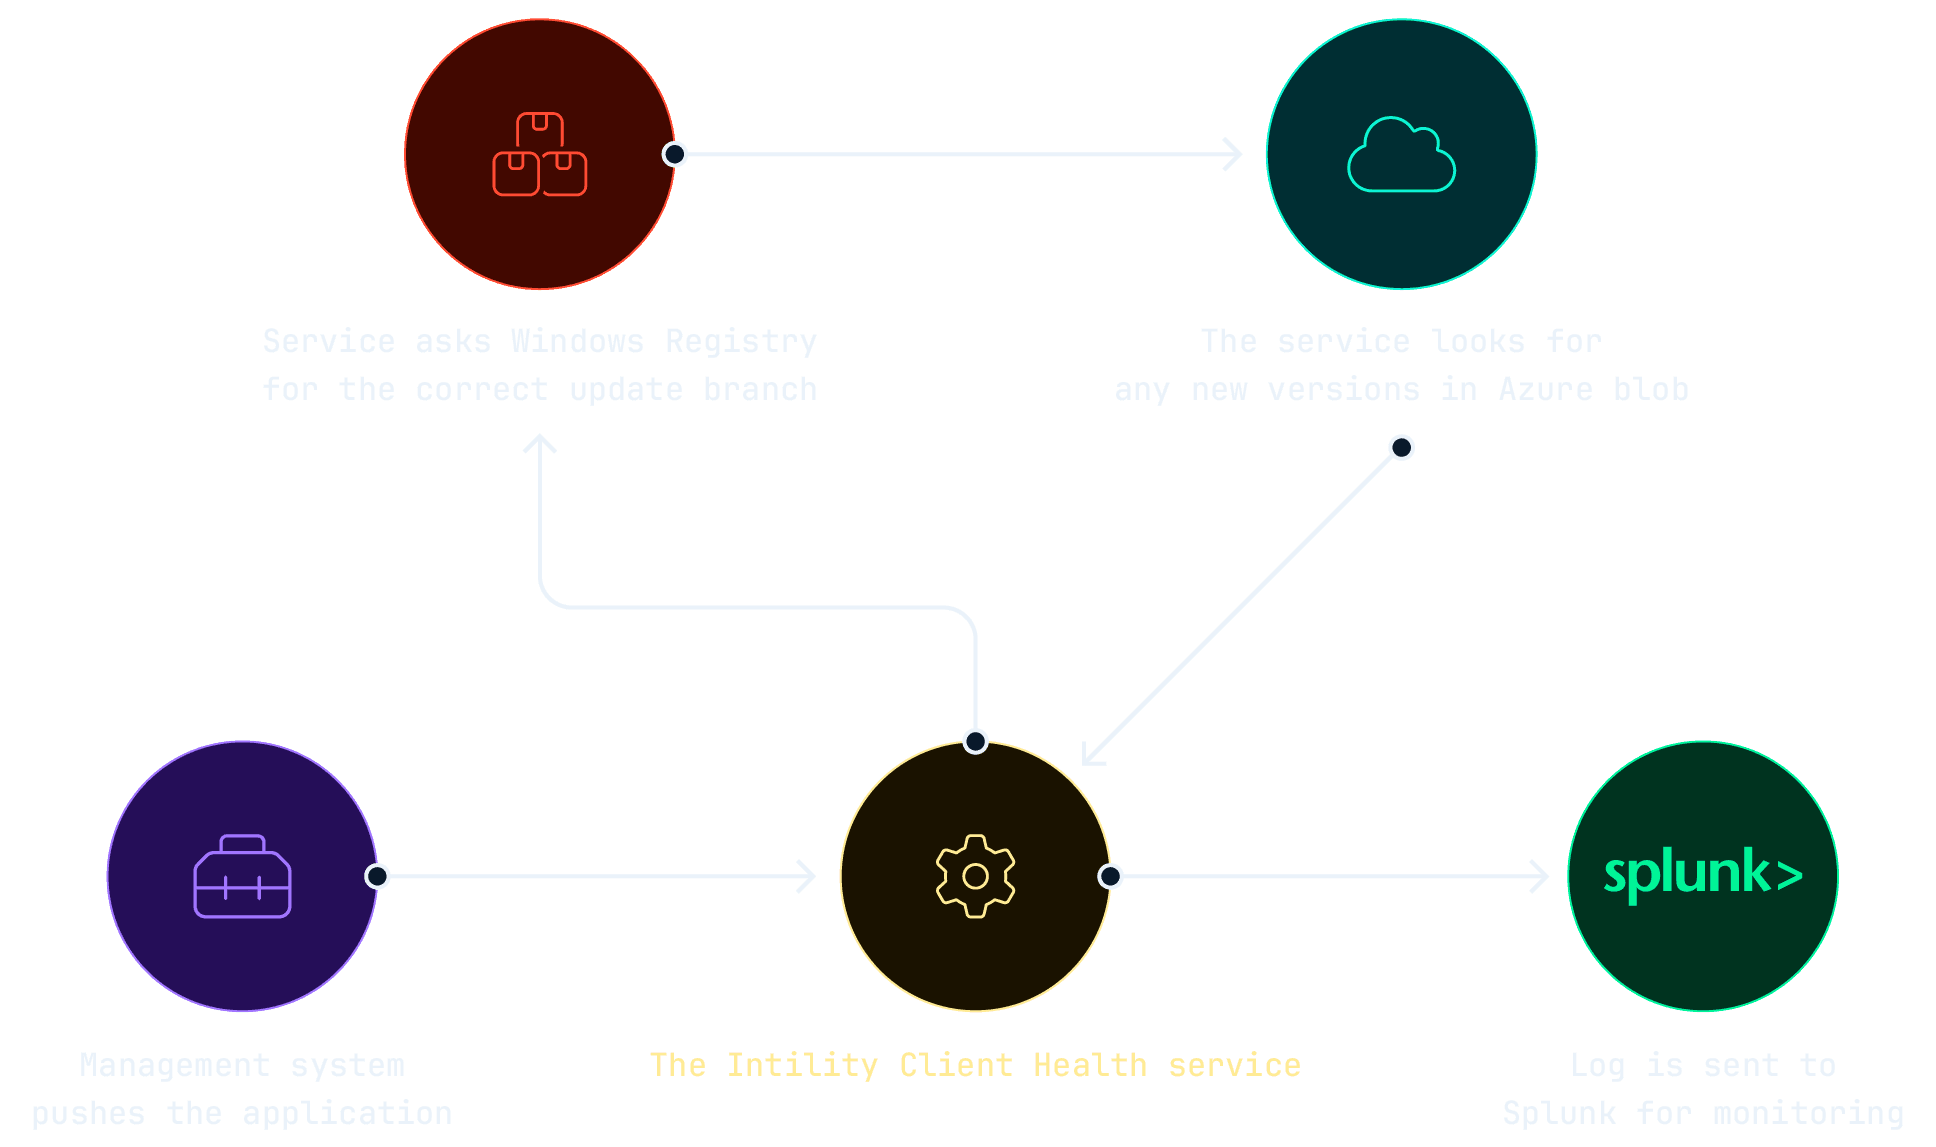
The application consists of an installation file that is used to install the service for all machines, regardless of differences in brands, models or management systems. Our management systems push an application package to all Windows devices, installing our background service which takes over from there. When the service starts up, it checks if any new versions of the ICH script is available in Azure for the current update channel, downloads if necessary and runs it after passing security checks, such as verifying file hash and digital signatures. From there, the service keeps checking for updates of ICH every hour, as well as when it should trigger the next run, currently set to once every 24 hours.
After a long period of internal testing, we discovered how reliable the service was in executing ICH on time compared to our old scheduled task approach. Additionally, the service strengthened our control with security checks that run before initiating ICH. These checks ensure that the script content hash matches our remote versions of the script in Azure, that it's signed with our certificate and that the correct version of the script is in place before executing it.

Intility Client Health summarized
Waves
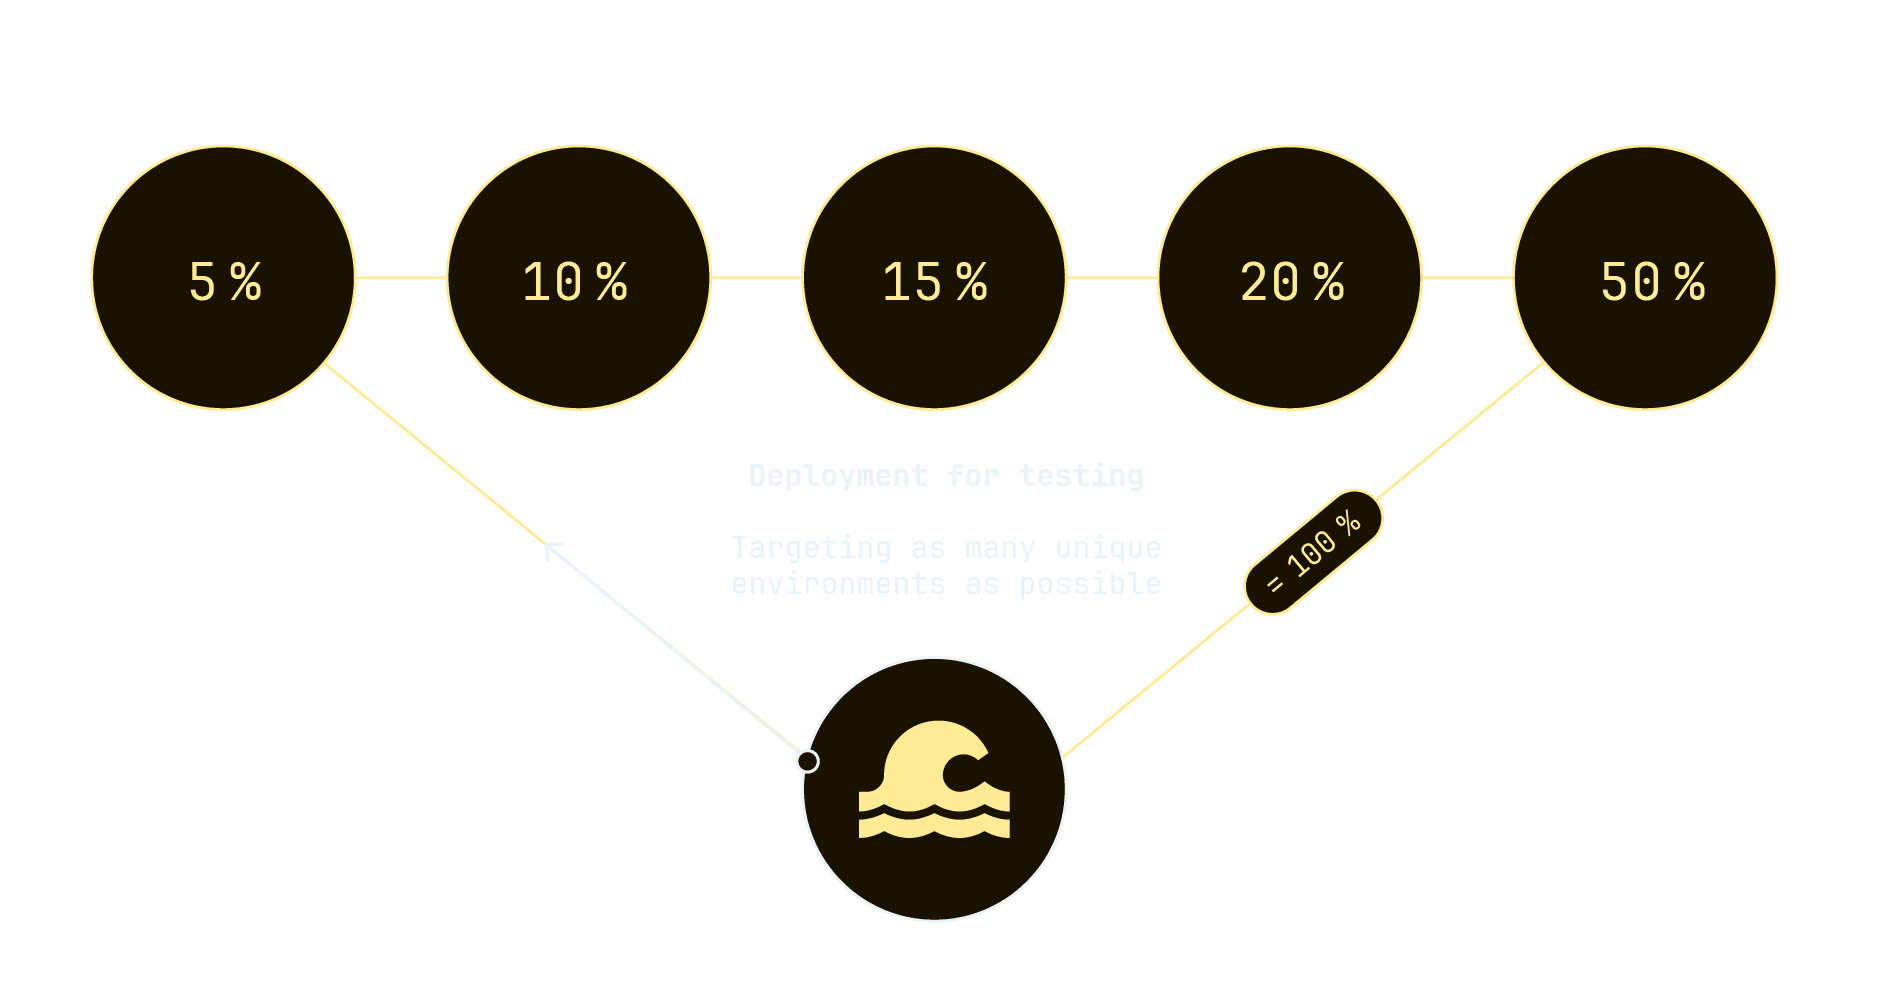
In parallel to developing Intility Client Health Service, we created a framework to be used when testing new features, called "Waves". Waves creates test groups, like Windows Update rings, evenly dividing devices into groups with custom percentage sizes. This allows for gradual and controlled testing of new features in as many unique environments as possible, while minimizing the impact on end-users' experience.

We used Waves to create and later update the "update channel" for ICH. The update channels are divided into General, Targeted and Insider and are configured in the Windows registry via policies. Using this simple concept of updating channels to decide on a target version of ICH to run, we can deploy new versions, bugfixes or rollback fast and seamlessly.
Read more about AppPackBot .
Both ICH and ICH Service sends their log to us via Splunk, where it is used in monitoring. We create dashboards using this data to drive our own development forward by:
- detecting bugs and trends across all clients
- monitoring how ICH is behaving by looking at top errors and remediations
- when ICH is being run
- correlations between errors and hardware, models, manufacturers etc.
Conclusions and going forward
Our journey developing Intility Client Health has been methodical. We wanted to start simple and iterate block by block, rigorously testing every change. This method has been crucial to avoid the pitfalls of overcomplexity, while making sure the project stays easy to maintain and develop.
As we progressed, we realized that in order to overcome certain core challenges we had to evolve our existing ICH solution. With Intility Client Health Service we are able to address real challenges such as ensuring correct configuration, maintenance, troubleshooting and compliance needs, and since its launch it has become clear how well the service fits into our device ecosystem.
Increasing complexity is emerging on all fronts. We see the potential for services such as Intility Client Health to abstract the many needs and translate it to a well-functioning user layer in the years ahead. One remediation at a time.
if (wantUpdates == true) {followIntilityOnLinkedIn();}


