
Engineering Our Engineering Blog: From Webflow to Payload
Written by
November 6, 2025
|
Approximately a 00 minutes read
Development
Visually, our engineering blog looks like it always has. Under the hood? It's undergone a complete transformation – from a Webflow, SaaS-powered blog to a custom-built, self-hosted Payload solution.
The History of This Engineering Blog
engineering.intility.com was built in early January 2022. At that time, I was still working as a graphic designer, and my department had no developer resources available – yet it was we who had become responsible for designing and building this blog.
I had built a few websites previously using Webflow, a SaaS (Software as a Service) website builder, so that felt like a natural tool for the job. One benefit of Webflow is that it enables for a rather rapid development cycle, where a designer can do both the design and the development of the site simultaneously. It also features a built-in CMS solution, something that's essential for a blogging website. It didn't take long before we had our engineering blog up and ready, built with, and hosted by, Webflow.
While the Webflow-version has served us well over the years, it did eventually start to show its age. For instance, the editor experience of adding code blocks to articles relied on adding a HTML-embed element, and manually adding <pre> and <code> tags surrounding the code-content in the embed element, including adding a class name for the appropriate programming language. Also, some people wanted to feature multiple authors on their article, making us add Author 2 and Author 3 fields to the config – which just isn't very scalable or a nice data structure to build around later. Lastly, it felt a bit awkward relying on someone else for hosting our website when we, as a tech company, manage hosting for plenty of our customers ourselves.
On top of all that, I also transitioned from my role as a graphic designer to being a frontend developer, so our department had direct access to a developer, and could start developing websites from code instead of relying on SaaS-solutions.
Choosing the Tech Stack
Every blog with respect for itself is powered by a CMS, enabling authors and editors to write and publish content without a developer having to edit the content into the source code and redeploy the blog every time new articles are being made. If you are unfamiliar with the term CMS, it stands for Content Management System, and is an application which functions as a sort of store for content. Some well known CMS applications include Wordpress, Sanity and Contentful.
Deciding on a CMS
When reviewing our options for a CMS, we had some requirements and wishes. It was important for us that the CMS:
- could be self-hosted
- offered highly customizable content types
- handled relational data well
- would be both developer and editor friendly
- could function as a headless CMS, allowing multiple different applications access to its content
After doing some research, we eventually stumbled upon Payload, a CMS-framework built on top of React and NextJS. Some of Payload's features that interested us are:
- Code-driven development and configuration
- Intuitive and customizable user interface for editors
- A rich set of built-in data types
- Very extensible by default – if you need something custom, you very likely can build it
- Possible to self-host
- Can function as a headless CMS
- Built-in localization support
- Well documented
Frontend Framework
This option was much more straightforward for us. As a company, almost all of our internal and external web applications are built with React. Since Payload comes as a NextJS app out of the box, and NextJS is a framework built on top of React, using NextJS for our frontend was a no-brainer. It allows other developers to more easily pitch in with development work if needed, and deploying our application to our Kubernetes Platform is going to be easier to work out. It's also the framework I am most comfortable working with.
Building the CMS
After the tech stack is landed, the next step is to start building. Frontend wise it's mainly a matter of connecting the new backend to an already existing design. The largest task to work on is building up the new backend in Payload. Let's look at a basic spec we had in mind when starting:
- We need various content types:
- Articles
- Authors
- Categories
- Media (images, videos and so on)
- Colors
- Editors need to be able to log in easily, preferably using SSO
- Editing content should feel easy and manageable, no matter your technical expertise
- Articles need to support advanced rich text features such as code blocks and highlights for emphasizing paragraphs in a editor-friendly manner
- Strong Role Based Access Control (RBAC) so not anyone from our company of 600+ can log in and publish whatever they want to the blog
- Previewing a post while working on it needs to be easy and not require the post to be published
This will give us a solid foundation for a blogging website. In this article we will mainly focus on the first point regarding the content types. SSO, RBAC and so on are a bit more advanced, and something I might write about in future articles.
Initializing Payload
Getting a Payload project up and running is as simple as running this command:
npx create-payload-appThis will automatically install Payload for you and scaffold a project. Their installer will ask you some questions, and you will have to make some choices regarding what database you want to use and so on. If you are brand new, using their website template is a very nice way to get a fleshed out project up and running very fast. For our use case, we start with a blank template so we can fine tune our CMS just how we want it.
After the installer is done running, cd into the project directory and open it in your code editor of choice.
Payload Terminology
I'm going to use some Payload-specific terminology going forward:
Collections
Collections are essentially a collection of documents that share a common schema. For this blog, we have configured collections for Articles, Authors, Colors, Media and Categories. Every Article an editor creates will have the same fields, or skeleton.
Documents
A document is one item from a Collection. This article is one Document from the Articles collection.
Fields
Fields are the building blocks in the CMS. Payload comes with a wide set of fields out of the box, like text, select, textarea, relationship and more. If at any point the included fields from Payload are too limiting, you can easily create and add your own. For this blog we have created a custom slug-field for instance, that we use on our Articles collection.
Globals
A global is a Collection with only one, singular Document. While you may want your content editors to be able to freely add and edit as many articles as they want for a blog, websites usually only have one header. Then you'd define a Global named 'header' for example, and add the relevant fields to it.
With that out of the way, let's look at how we define the collections we need for our blog via code.
Defining Collections
Creating a collection in Payload is easy. Let's start with a very simple one: Categories. Every article will want to have a category associated with it. While this could be a select-field that we manually populate with options, I like to make it its own collection so editors can add categories themselves without developers having to add them in the code and redeploy the entire application.
Another benefit of having them as collections is that it will be easier to create category-pages per category down the line if we want to build that, since each Category easily could be expanded to include its own slug-field for instance.
To keep things organized, I like to put my Collection config files in a folder named collections within the src/payload folder.
import { CollectionConfig } from 'payload'

export const Categories: CollectionConfig = {
  slug: 'categories',
  admin: {
    useAsTitle: 'name',
  },
  fields: [
    {
      name: 'name',
      type: 'text',
      required: true,
    },
  ],
}
Every collection needs a slug. This is what you will reference it by, both when connecting collections together using relationship fields, and when fetching data from Payload. The slug is also what defines the table name in the database, although you can override this if you want.
In the fields-array we define one field that is of type text, has a name of 'name' and is required. That's all a category really needs, at least for this blog.
By default, Payload uses a document's ID as its title unless we tell it what to use. An ID is not very user friendly to read, so I like to set a top-level title or name field as the collection title most of the time. This will also come in handy later, when we define our Article collection.
After you have saved this file, we need to tell Payload that it is part of the CMS config. Open payload.config.ts, which is the main config file for the entire Payload application. Look for collections inside the buildConfig function, which should be an array that is pre-populated with some basic collections. Import and add our newly created Categories to it:
import { Categories } from './payload/collections/categories'

export default buildConfig({
  {...},
  collections: [Users, Media, Categories],
  {...},
})
Now Payload will include Categories in its config, and generate TypeScript-types based on it for you in an automatically generated file named payload-types.ts.
/**
 * This interface was referenced by `Config`'s JSON-Schema
 * via the `definition` "categories".
 */
export interface Category {
  id: number;
  name: string;
  updatedAt: string;
  createdAt: string;
}
Let's skip past users.ts and see what our articles.ts looks like:
import { CollectionConfig } from 'payload'
import { SlugField } from '../fields/slug/SlugField'

export const Articles: CollectionConfig = {
  slug: 'articles',
  admin: {
    useAsTitle: 'title',
    defaultColumns: ['title', 'authors', 'publishedAt', 'status'],
  },
  defaultSort: '-publishedAt',
  fields: [
    {
      type: 'row',
      fields: [
        {
          name: 'title',
          type: 'text',
          required: true,
        },
        ...SlugField('title'),
      ],
    },
    {
      type: 'tabs',
      tabs: [
        {
          label: 'Meta',
          fields: [
            {
              name: 'authors',
              type: 'relationship',
              relationTo: 'users',
              hasMany: true,
              maxRows: 3,
            },
            {
              type: 'row',
              fields: [
                {
                  name: 'category',
                  type: 'relationship',
                  relationTo: 'categories',
                  hasMany: false,
                },
                {
                  name: 'color',
                  type: 'relationship',
                  relationTo: 'colors',
                  hasMany: false,
                },
              ],
            },
            {
              name: 'image',
              type: 'upload',
              relationTo: 'media',
            },
            {
              name: 'publishedAt',
              type: 'date',
              admin: {
                date: {
                  displayFormat: 'd. MMMM, yyyy',
                  overrides: {
                    calendarStartDay: 1,
                  },
                },
              },
            },
          ],
        },
        {
          label: 'Content',
          fields: [
            {
              name: 'excerpt',
              type: 'textarea',
            },
            {
              name: 'content',
              type: 'richText',
              editor: lexicalEditor({
                features: ({ defaultFeatures }) => [
                  HeadingFeature({
                    enabledHeadingSizes: ['h2', 'h3', 'h4', 'h5', 'h6'],
                  }),
                  BlocksFeature({
                    blocks: [CalloutBlock, CodeBlock],
                  }),
                ],
              }),
            },
          ],
        },
      ],
    },
  ],
}
It seems like there is a lot going on here, but it's all fairly simple. First we define the useAsTitle property as we did with the Category collection, but we also define some default columns. This controls which fields are selected by default when viewing a Collection in the Admin UI.
Next we define a few fields, and organize them within rows and tabs, which are also fields themselves. Rows and tabs are presentational fields, meaning they only dictate how fields appear in the UI, and aren't stored in the database.
Notice how we connect our previously configured Categories-collection to this new Articles-collection:
fields: [
  {
    name: 'category',
    type: 'relationship',
    relationTo: 'categories',
    hasMany: false,
  }
]
Let's break it down.
- We define a field and name it 'category'.
- We set its type to 'relationship', which is a field that connects two (or more!) collections together.
- We set the relationTo property to 'categories', matching the slug we set for our Categories collection earlier.
- Lastly, we set hasMany to false because an article is only supposed to have one category – for our use case at least.
Now editors can select one of the created categories for an article they are working on, or create a new one if they need to.
At the bottom of our articles.ts, we have defined a richText field named 'content'. We have customized it a bit, and have disabled editors from being able to use <h1> headings in their articles, since we use the 'title' field as the H1-tag for the article. The more interesting part, however, is the BlocksFeature. This is a very powerful feature. Let's go over how it works by looking at our code block implementation.
How the Code Blocks Work
Payload comes with a built in code field type that we can use for adding code to our collections – but the field that contains the article content is the 'content' field, which is a richText field. Luckily for us, Payload's richText field is using Lexical under the hood, and they have configured it in such a way that makes it very easy to extend it yourself in a way that is very similar to how you interface with Payload normally. You can define what is called Blocks, which is a group of Fields. Then you can add this Block to the richText-field config, and after that editors can add this block anywhere in the rich text editor.
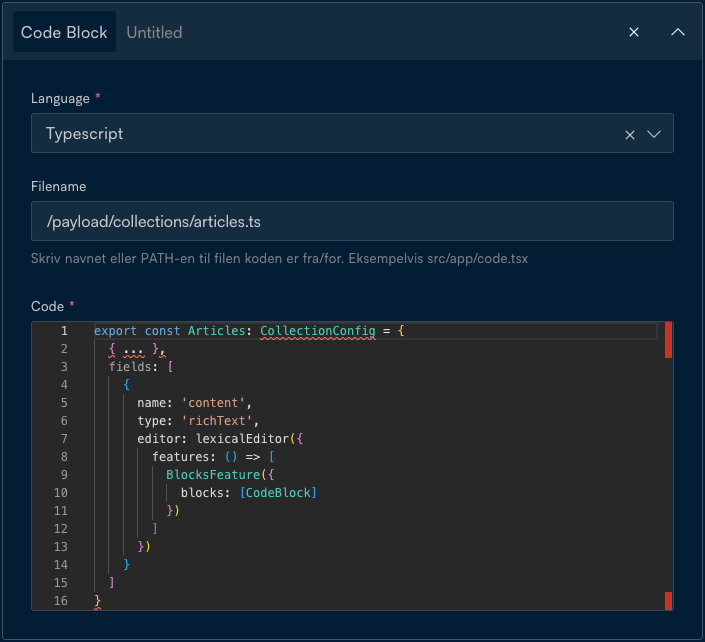
This is what our Code Block component looks like:
import { shikiLangs } from '@/utils/shikiConfig'
import { Block } from 'payload'

export const CodeBlock: Block = {
  slug: 'codeBlock',
  fields: [
    {
      type: 'row',
      fields: [
        {
          name: 'language',
          type: 'select',
          required: true,
          options: shikiLangs,
          defaultValue: 'ansi',
        },
        {
          name: 'filename',
          type: 'text',
        },
      ],
    },
    {
      name: 'code',
      type: 'code',
      required: true,
    },
  ],
}
The shikiLangs variable is an array of language-name and language-key objects we use on our blog. We use Shiki to render these on the frontend.
Below is how this is added to the richText-field:
import { CalloutBlock } from './ArticleBlocks/calloutBlock'
import { CodeBlock } from './ArticleBlocks/codeBlock'

export const Articles: CollectionConfig = {
  { ... },
  fields: [
    {
      name: 'content',
      type: 'richText',
      editor: lexicalEditor({
        features: () => [
          BlocksFeature({
            blocks: [CalloutBlock, CodeBlock]
          })
        ]
      })
    }
  ]
}
This in turn looks like this in the editor:
That's all it takes to extend the built-in richText field. You can also define inline blocks, that can be inserted mid-text when writing. Because the blocks can contain whatever fields you desire, it's very easy to let editors add a ton of various data and components directly in articles.
Our other collections for this blog are pretty straight forward, apart from our Users collection that allows employees to sign into the CMS at the /admin route. How that is configured is a bit out of scope for this article, but I'll leave a link to it here if I end up writing an article about it. For now, let's take a step back and look at how our new, custom self-built solution compares to our previous, Webflow SaaS-version.
The Old Versus The New
Now that we've got most of the technical stuff out of the way, let's reflect a bit on what all this work has gained us in comparison to our old solution with Webflow.
Let's quickly summarize some cons with the old solution:
- SaaS solution, with no self-host option.
- Limited by the Webflow CMS capabilities:
- Having to hard-code in a Author 2 and Author 3 field when needing multiple authors after a Author field had already been defined.
- Rich text has to be extended via a HTML Embed element that requires publishing the page to preview.
- Hard limits on including nested collections/related collections on article pages.
- Limited by the Webflow Designer in terms of design and functionality.
- No SSO, every new author had to get an account created for them.
- Privacy concerns related to GDPR, with us being an European company, and Webflow being an American SaaS-provider.
While Webflow's managed infrastructure was convenient when we lacked developer resources, that benefit became less relevant as I transitioned from a designer to a developer. Additionally, we have a lot of technical, engineering and development expertise in our company, so setting up and managing our own infrastructure was something we knew we could get help and assistance with if needed.
The Benefits
Our new solution allows article authors to seamlessly sign in via SSO, and edit articles in a CMS custom made to writing articles for this blog specifically. Adding code blocks is also something that feels integrated into the editing experience, rather than something they have to fidget with in a precise manner to get working properly. They can also get a fully fledged preview of their article without having to publish it, a major grievance we had with our Webflow solution.
On top of this, there are also some benefits to dealing with the infrastructure ourselves. Our blog is now hosted on our own servers, instead of someone else's. This means we have full insight into the technical aspect of our blog, and can measure server performance, work on improving load times and more. While deploying a NextJS+Payload app to Kubernetes hasn't been without its fair share of headaches, it feels very good having full insight into how our blog is configured both from a content view and an infrastructure view.
From a development perspective, Payload is very nice to work with since you automatically get Typescript types for all of your defined collections. This means building up the frontend for rendering the collections and data in the CMS is much more straightforward, and automatically type safe out of the box. The LocalAPI, which I'll talk about later in this post, removes the need to manage API-keys and configure REST-APIs for data fetching. The entire CMS data structure is also code defined, so modifying the data structure of a collection is as simple as modifying a Typescript file, and committing the changes. You also need to run a migration so your database knows the structure, but luckily Payload has some built-in scripts that makes this easy for someone with just frontend-experience.
Performance wise we haven't noticed a big difference. This website isn't very demanding, and performed fine on Webflow, and performs fine on our own infrastructure. We have implemented measures such as High Availability, a shared Redis Cache, ISR to achieve this, which is something we never had to think about when using Webflow.
The new solution also feels very future-proof, in the sense that Payload is a very extensible and customizable CMS. If we in the future want to add some functionality to this blog, we most likely can achieve it without having to reach for another solution.
Data Fetching
The last point I want to touch on is how we get the data from our CMS to the frontend. This is a crucial part when working with a CMS-powered frontend application, where most or all of the content on the website is fetched from an external source.
Since Payload is a NextJS app, we have the possibility of running both the CMS and the frontend in the same repo. This is nice for various reasons:
- Centralized code and dependencies
- Smoother deployment flow – it's just one application
- Payload's auto-generated types based on the collections are automatically exposed to the frontend
- Payload's LocalAPI
That last point is the main reason why we chose to run with integrating Payload directly in the frontend repo. From Payload's documentation on LocalAPI:
The Local API is incredibly powerful when used in React Server Components and other similar server-side contexts. With other headless CMS, you need to request your data from third-party servers via an HTTP layer, which can add significant loading time to your server-rendered pages. With Payload, you don't have to leave your server to gather the data you need. It can be incredibly fast and is definitely a game changer.
In other words, we utilize some built-in Payload functionality to directly access the data from the database, without having to make requests over the internet for it.
Initializing it is easy:
import { getPayload } from 'payload'
import config from '@/payload.config'

export const initLocalApi = async () => {
  const payloadConfig = await config
  const payload = await getPayload({ config: payloadConfig })
  return payload
}
Then using it is no more difficult than this:
import { initLocalApi } from '../utils/initLocalApi'

export const queryArticleBySlug = async (slug: string) => {
  const payload = await initLocalApi()
  const data = await payload.find({
    collection: 'articles',
    limit: 1,
    pagination: false,
    where: {
      slug: {
        equals: slug,
      },
    },
  })
  return data.docs?.[0] || null
}
Now we have easy access to our articles from the CMS in our frontend without having to deal with complex REST-API URL-queries, managing API-Keys to securely fetch and so on – it's all handled by the LocalAPI. The resulting object from the query is also automatically typed according to the collection definition.
Monorepo Considerations
There are some considerations to keep in mind when opting to go the monorepo route. The build times will naturally increase, since your app needs to build both the Payload and the frontend parts of the app. You're also serving both the CMS and the frontend from the same deployment/server, meaning that if the server should go down, everything goes down.
If you are planning to mitigate this by setting up High Availability, suddenly you're facing a situation where you have your CMS+frontend deployed to three or more instances in a Kubernetes cluster, meaning that you in theory have three different NextJS-applications that each manage their own cache internally. To solve this, you need to set up a separate, external Redis cache solution that you tell your NextJS-applications to use instead via a custom cache handler, and the list goes on. It's a bit more technical and heavy on the infrastructure if you go the self-hosted route, but it's definitely achievable. Payload works well with Vercel, if you are using their platform for hosting your web applications and don't want to deal with all of the above.
LocalAPI Alternatives
Say you don't want to use the LocalAPI for one reason or another. Your frontend might be written in something other than NextJS, or live in another repo entirely. Luckily for you, Payload automatically generates REST-API and GraphQL-endpoints for all your collections and globals. Fetching data this way requires a little bit more setup than just using the LocalAPI, but not much. You need a collection that has authentication enabled, and set useAPIKey to true. I recommend setting disableLocalStrategy to true, so it doesn't turn into a user-type collection that people actually can sign in to, but rather a collection of backend API-users that you can give various levels of access to your application, based on your own RBAC configuration within Payload.
const ApiUsers: CollectionConfig = {
  slug: 'apiUsers',
  auth: {
    useAPIKey: true,
    disableLocalStrategy: true,
  },
  { ... }
}
All that's left then is simply to create a new API-User in the new ApiUsers-collection, enable the API-key and use this as a token in the header when making requests against the REST-API.
For our use case for this engineering blog, the LocalAPI has been performing great. We don't build and deploy this app very often, so the increased build times aren't a big deal for us. We have also managed to configure High Availability with Redis Caching and set up ISR, to mitigate some of the monorepo challenges when self-hosting a NextJS+Payload application in Kubernetes.
Wrapping Up
Now we have covered the basic setup of a NextJS+Payload application for basic blogging purposes, with some additional configuration for adding code blocks to the Rich Text field, as well as a brief look into the basics of fetching the data from Payload to the frontend.
There's still a lot more I could touch on regarding our NextJS+Payload applications:
- SSO, so all our 600+ employees can sign in and start working automatically
- RBAC, so not all of our 600+ employees can sign in and edit whatever they want
- High Availability configuration in Kubernetes
- ISR configuration so the app is cached as much as possible, while still being fully dynamic
... and probably loads more. Each of these topics deserve a post of their own, and I intend to write about some of them in future articles.
If there are specific topics you'd like to see covered, or if you have questions about our implementation, feel free to reach out! You can mail me at [email protected], or message me on LinkedIn.
if (wantUpdates == true) {followIntilityOnLinkedIn();}
Other Articles


Platform
June 26, 2026
Beyond Intelligence: Benchmarking Speed and Cost of Self-Hosted vs. Frontier LLMs

Erfan Mohammadi