
Guide to High Availability in Kubernetes
Written by
May 23, 2022
|
Approximately a 00 minutes read
Tutorial
This article aims to be a complete guide to running High Availability (HA) applications in Kubernetes
Introduction
When running applications in Kubernetes one might quickly take for granted all the great HA functionality that comes out of the box. If one node running pods goes down, those pods will automatically be rescheduled on another node if available. As a developer there is nothing you need to actively do in order to achieve this.
For a lot of applications this might be more than enough, but when your project reaches a certain size or level of complexity you might find it lacking. SLA's might come into play, and you will want to make sure that your services can handle a variety of different disruptions.
This guide is written with OpenShift as the platform of choice, but should be applicable to most Kubernetes distributions.
In cases where the provided examples are not extensive enough, please see the documentation referenced in each section.
Replicas
The first recommendation is the most simple: run multiple copies (replicas) of your application.
If your application supports it, you should ensure that there are at least 2 or more replicas of it. The number of replicas should be considered from how many underlying nodes that are available. Scaling up to a hundred replicas when you only have a single node available is pretty pointless from an HA perspective.
In a Deployment this can be set in .spec.replicas:
apiVersion: apps/v1
kind: Deployment
metadata:
  name: nginx-deployment
  labels:
    app: nginx
spec:
  replicas: 3
  selector:
    matchLabels:
      app: nginx
  template:
    metadata:
      labels:
        app: nginx
    spec:
      containers:
      - name: nginx
        image: nginxinc/nginx-unprivileged:1.20
        ports:
        - containerPort: 8080
Kubernetes will now ensure that we always have 3 replicas of our nginx pod, however it does not take availability of the pods into account. We will cover how to handle this in the next section.
References
Pod Disruption Budget
A PodDisruptionBudget (pdb) protects your pods from voluntary disruption, which can happen if nodes are drained for maintenance or during upgrades.
As the name suggests, it does this by creating a budget. You are essentially telling Kubernetes how many pods you can afford to lose.
You can create a pdb like this:
apiVersion: policy/v1
kind: PodDisruptionBudget
metadata:
  name: pdb
spec:
  minAvailable: 2
  selector:
    matchLabels:
      app: nginx
This pdb would ensure that there is always 2 pod matching the app=nginx label available.
In our example this would target these pods:
$ oc get pods -l app=nginx -o wide
NAME                               READY   STATUS
nginx-deployment-94795dbf6-thjws   1/1     Running
nginx-deployment-94795dbf6-xhvn6   1/1     Running
nginx-deployment-94795dbf6-z2xt9   1/1     Running
If two your pods happen to be scheduled on the same node and it gets drained for maintenance, the Kubernetes scheduler will ensure that after evicting one of the pods, the other will not be evicted before the the first one is up and running (there are always 2 pods available).
To check the status of a pdb:
$ oc get pdb
NAME   MIN AVAILABLE   MAX UNAVAILABLE   ALLOWED DISRUPTIONS   AGE
pdb    2               N/A               1                     31m

$ oc describe pdb pdb
Name:           pdb
Namespace:      pdb-testing
Min available:  2
Selector:       app=nginx
Status:
    Allowed disruptions:  1
    Current:              3
    Desired:              2
    Total:                3
Availability must be specified with either .spec.minAvailable or .spec.maxUnavailable
For .spec.maxUnavailable this value can be set with an integer or in percentage, .spec.minAvailable can only be set with an integer.
A pdb works on the following resources:
- Deployment
- ReplicationController
- ReplicaSet
- StatefulSet
Note: If you set minAvailable: 100%, that means the same as maxUnavailable: 0%. This is impossible in practice and will prevent the scheduler from evicting your pods, making life difficult for your administrator.
Said another way: disruptionsAllowed cannot be 0. This happens for example if you set minAvailable to 2 when your application only runs with 2 replicas.
The point of a pdb is to tell the scheduler that a certain amount of pods can go down without majorly affecting your application. A sort of compromise between the developer and the administrator.
References
- https://kubernetes.io/docs/tasks/run-application/configure-pdb
- https://innablr.com.au/blog/what-is-pod-disruption-budget-in-k8s-and-why-to-use-it
- https://cloud.google.com/blog/products/management-tools/sre-error-budgets-and-maintenance-windows
- https://sre.google/workbook/alerting-on-slos/#low-traffic-services-and-error-budget-alerting
Pod Anti-Affinity
Kubernetes will try to spread pods across nodes based on resource usage by default. This can be customized by using a scheduling profile[link] but we will not cover that in this guide.
By specifying pod affinity, you ensure certain pods run on the same node(s).
Two types of affinity can be used:
- requiredDuringSchedulingIgnoredDuringExecution: Pods won't be scheduled unless the rule is met.
- preferredDuringSchedulingIgnoredDuringExecution: The scheduler will try to follow the rule, if not it may schedule it on different nodes.
You can use either one or both of these, here is an example from the Kubernetes docs of a pod with affinity:
apiVersion: v1
kind: Pod
metadata:
  name: with-node-affinity
spec:
  affinity:
    nodeAffinity:
      requiredDuringSchedulingIgnoredDuringExecution:
        nodeSelectorTerms:
        - matchExpressions:
          - key: kubernetes.io/os
            operator: In
            values:
            - linux
      preferredDuringSchedulingIgnoredDuringExecution:
      - weight: 1
        preference:
          matchExpressions:
          - key: another-node-label-key
            operator: In
            values:
            - another-node-label-value
  containers:
  - name: with-node-affinity
    image: k8s.gcr.io/pause:2.0
What we are interested in however is to make sure our pods are spread across nodes to maximize availability, without trusting the default scheduling blindly. For this we will configure pod anti-affinity.
Anti-Affinity is defined in the Pod spec:
apiVersion: v1
kind: Pod
metadata:
  name: with-pod-antiaffinity
spec:
  affinity:
    podAntiAffinity:
      requiredDuringSchedulingIgnoredDuringExecution:
        - labelSelector:
            matchExpressions:
              - key: app
                operator: In
                values:
                  - nginx
            topologyKey: kubernetes.io/hostname
Since we rarely deploy pods individually, lets's add that to our Deployment from the previous section:
apiVersion: apps/v1
kind: Deployment
metadata:
  name: nginx-deployment
  labels:
    app: nginx
spec:
  replicas: 3
  selector:
    matchLabels:
      app: nginx
  template:
    metadata:
      labels:
        app: nginx
    spec:
      containers:
        - name: nginx
          image: nginxinc/nginx-unprivileged:1.20
          ports:
            - containerPort: 8080
      affinity:
        podAntiAffinity:
          requiredDuringSchedulingIgnoredDuringExecution:
            - labelSelector:
                matchExpressions:
                  - key: app
                    operator: In
                    values:
                      - nginx
              topologyKey: kubernetes.io/hostname
Let's see what this would look like in practice.In this environment we have 3 nodes available:
$ kubectl get node
NAME           STATUS   ROLES    AGE   VERSION
node-1         Ready    worker   15d   v1.23.3+e419edf
node-2         Ready    worker   15d   v1.23.3+e419edf
node-3         Ready    worker   15d   v1.23.3+e419edf
Since we are using topologyKey=kubernetes.io/hostname in our Anti-Affinity configuration, we can expect that our pods will be spread like this:
$ kubectl get node -l kubernetes.io/hostname=node-1
NAME     STATUS   ROLES    AGE   VERSION
node-1   Ready    worker   15d   v1.23.3+e419edf

$ kubectl get node -l kubernetes.io/hostname=node-2
NAME     STATUS   ROLES    AGE   VERSION
node-2   Ready    worker   15d   v1.23.3+e419edf

$ kubectl get node -l kubernetes.io/hostname=node-3
NAME     STATUS   ROLES    AGE   VERSION
node-3   Ready    worker   15d   v1.23.3+e419edf
Checking the pods in our deployment, this is indeed the case:
$ kubectl get pods -o wide
NAME                                READY   NODE
nginx-deployment-7dffdbff88-2z5vb   1/1     node-1
nginx-deployment-7dffdbff88-64fwd   1/1     node-2
nginx-deployment-7dffdbff88-7zr7z   1/1     node-3
Even after doubling the amount of replicas, the pods are spread out nice and evenly:
$ kubectl scale --replicas=6 deployment/nginx-deployment
deployment.apps/nginx-deployment scaled

$ kubectl get pods -o wide
NAME                                READY   STATUS              NODE
nginx-deployment-7dffdbff88-2z5vb   1/1     Running             node-1
nginx-deployment-7dffdbff88-64fwd   1/1     Running             node-2
nginx-deployment-7dffdbff88-7zr7z   1/1     Running             node-3
nginx-deployment-7dffdbff88-j8x2r   0/1     ContainerCreating   node-1
nginx-deployment-7dffdbff88-8jxw7   0/1     ContainerCreating   node-2
nginx-deployment-7dffdbff88-vd8dn   0/1     ContainerCreating   node-3
If your nodes are labeled with availability zone / datacenter you could also use that to spread pods if preferred. The label usually used for this is topology.kubernetes.io/zone.
References
- https://kubernetes.io/docs/concepts/scheduling-eviction/assign-pod-node
- https://kubernetes.io/docs/concepts/scheduling-eviction/assign-pod-node/#inter-pod-affinity-and-anti-affinity
- https://docs.openshift.com/container-platform/4.10/nodes/scheduling/nodes-scheduler-pod-affinity.html
- https://docs.openshift.com/container-platform/4.10/nodes/scheduling/nodes-scheduler-profiles.html
- https://kubernetes.io/docs/reference/scheduling/config
Node Topology
Nodes should be spread across multiple datacenters (or zones). This helps avoid downtime in the event of an infrastructure failure on one datacenter.
Topology is reflected inside Kuberenetes with the previously mentioned topology.kubernetes.io/zone label.
Health Checks
Health checks helps Kubernetes understand the state of your application. Without health checks, Kuberentes will only know that your application has crashed if it throws error code 1.
There are three different types of probes: startup, readiness and liveness.
Depending on your application you might want to use all, some or none of them. It is up to you to consider.
- StartupRuns only on startup
- ReadinessRuns throughout the whole pod lifetimeLet's say you have 3 replicas running and one of them needs to restart. Without a readiness probe, the service in front of the pods might send traffic to the newly restarted before the application running inside it is ready to accept traffic.
- LivenessRuns throughout the whole pod lifetimeThe kubelet uses liveness probes to know when to restart a container. For example, liveness probes could catch a deadlock, where an application is running, but unable to make progress. Restarting a container in such a state can help to make the application more available despite bugs.
Here's a useful diagram that visualizes the three different probes:
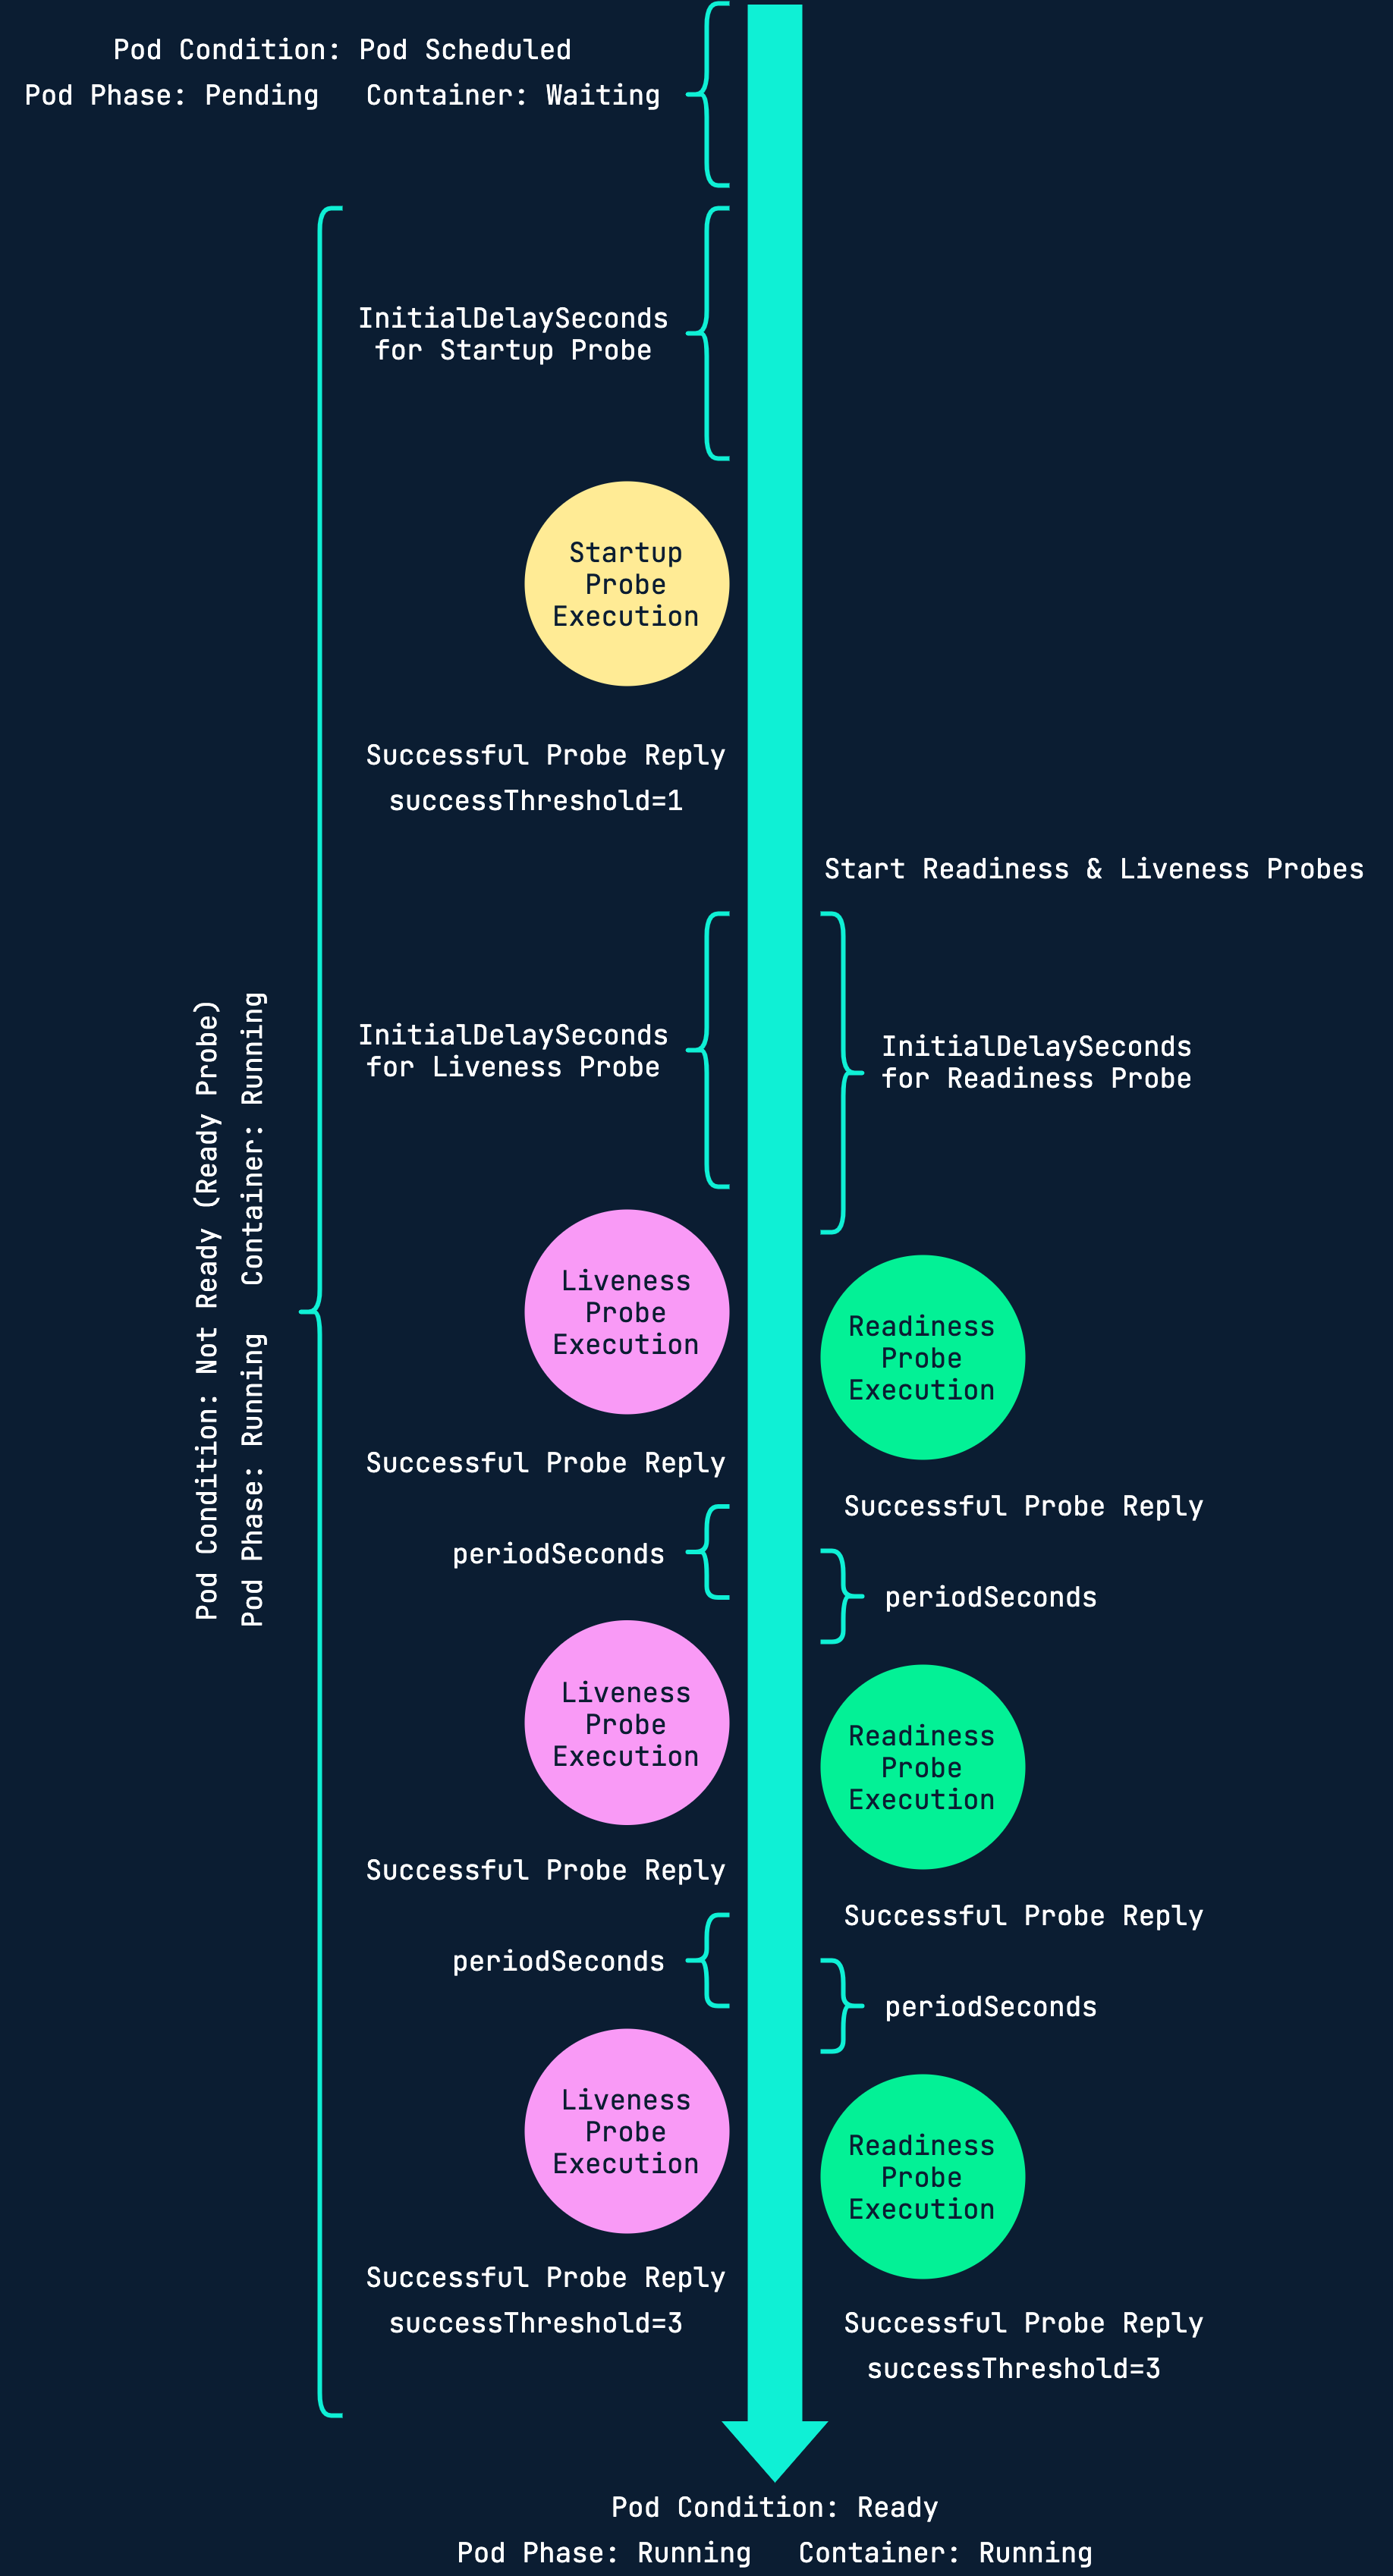
You can configure probes to use different types of tests:
- HTTP GETCheck pod status based on response from an http endpoint on your container (e.g /health)
- Container CommandRun a shell command inside the container to determine status
- TCP socketTry to open a TCP port on the container to check status
References
- https://docs.openshift.com/container-platform/4.10/applications/application-health.html
- https://kubernetes.io/docs/tasks/configure-pod-container/configure-liveness-readiness-startup-probes
- https://kubernetes.io/docs/concepts/workloads/pods/pod-lifecycle
- https://loft.sh/blog/kubernetes-probes-startup-liveness-readiness
Disaster Recovery
Being able to recover fast after an incident is key.
Usually in the event of an infrastructure failure, Kubernetes will recover automatically as soon as the underlying problem is fixed.
However, in the rare case where a cluster would have to be recreated or migrated from, there's a few things you can do to reduce time spent on recovery.
GitOps
One of the best way to recover quickly in Kubernetes is by using GitOps / Infrastructure-as-Code.
By having your resources and even entire cluster defined in Git (be it with Helm, Kustomize or just pure YAML files), you always have the blueprint for how to host your application if you should ever need to deploy somewhere.
Argo CD and Flux are some good examples of open source projects that can be used to do GitOps in Kubernetes.
Backup
If you have all your Kubernetes resources in Git, that can be considered a sort of backup and you can pat yourself on the back.
If your database is running in Kuberenetes this alone is of course not enough, so you need to make sure that you take proper backups if you value your data. The same applies if your have any important data in persistent volumes.
There are a few ways to do this, here is one example:
- Run a Kubernetes CronJob that dumps the DB to file
- Upload the dump to an NFS/CIFS server or Object Storage
You can also use tools like Velero to back up all resources in your Kubernetes cluster including volumes.
References
Resources and Scheduling
A very important factor in HA is to not overload the nodes your pods are running on. If you do not take preventative steps, a memory leak in one of your applications for example could bring down your entire production environment.
This section describes how resources and scheduling works and how you can reserve CPU and memory for your workloads.
The Kubernetes documentation describes scheduling like this:
In Kubernetes, scheduling refers to making sure that Pods are matched to Nodes so that Kubelet can run them.A scheduler watches for newly created Pods that have no Node assigned. For every Pod that the scheduler discovers, the scheduler becomes responsible for finding the best Node for that Pod to run on.
Because there is no way for the Kubernetes scheduler to know how much resources your application is going to use before it is scheduled, you need to provide this information beforehand. If you don't, there is nothing stopping a pod from using all the available resources on a node.
There are two pieces of information that has to be provided for both CPU and memory:
- Resource requestthe minimum amount that should be reserved for a pod. This should be set to the resource usage under normal load for your application.
- Resource limitthe maximum amount that a pod should ever use, if usage reaches the limit it will be terminated.
Memory is specified in bytes. You can use a plain integer or one of there suffixes: E, P, T, G, M, k. As the Kubernetes documentation mentions, you can also use the equivalent power-of-two suffixes: Ei, Pi, Ti, Gi, Mi, Ki
You need to be careful with the casing of suffixes, as warned about in the documentation:
If you request 400m of memory, this is a request for 0.4 bytes. Someone who types that probably meant to ask for 400 mebibytes (400Mi) or 400 megabytes (400M)
CPU resources are specified in cores, which can be specified like this: 1.0, 0.5, 100m. The m suffix means millicore (or millicpu), a thousand of a core.
To quote the Kubernetes documentation once again:
In Kubernetes, 1 CPU unit is equivalent to 1 physical CPU core, or 1 virtual core, depending on whether the node is a physical host or a virtual machine running inside a physical machine.
For a node with 4 CPU's, we have 4 cores which also means 4000 millicores total.
In a Pod spec, requests and limits can be set in .spec.containers[].resources:
apiVersion: v1
kind: Pod
metadata:
  name: frontend
spec:
  containers:
  - name: app
    image: images.my-company.example/app:v4
    resources:
      requests:
        memory: "64Mi"
        cpu: "250m"
      limits:
        memory: "128Mi"
        cpu: "500m"
Let's have a closer look:
requests:
  memory: "64Mi"
  cpu: "250m"
This tells the scheduler to reserve atleast 64 mebibytes of memory and 250 millicores for the app container in the frontend pod.
limits:
  memory: "128Mi"
  cpu: "500m"
Here we tell the scheduler to stop the app container from using more than 128 mebibytes of memory or 500 millicores. If it goes over the limits, it will be terminated. Without a limit, a container could potentially consume so much CPU or memory that it affects the performance of the underlying node (worst case bringing it to a halt).
References
- https://stackoverflow.com/questions/54099425/pod-cpu-throttling
- https://komodor.com/learn/kubernetes-cpu-limits-throttling
- https://blog.turbonomic.com/kubernetes-cpu-throttling-the-silent-killer-of-response-time-and-what-to-do-about-it
- https://erickhun.com/posts/kubernetes-faster-services-no-cpu-limits
- https://medium.com/omio-engineering/cpu-limits-and-aggressive-throttling-in-kubernetes-c5b20bd8a718
- https://en.wikipedia.org/wiki/Completely_Fair_Scheduler
LimitRange
If you want to avoid setting requests and limits on all your deployments individually, you create a LimitRange for an entire namespace.
This will add limits and/or requests to all pods in the namespace without it.
A simple LimitRange looks like this:
apiVersion: v1
kind: LimitRange
metadata:
  name: limit-range
spec:
  limits:
  - defaultRequest:  # Default REQUEST
      memory: 256Mi
      cpu: 250m
    default:         # Default LIMIT
      memory: 512Mi
      cpu: 500m
    type: Container
The naming used here is a bit confusing, so just to clarify:
- .spec.limits.defaultRequest sets the default resource request
- .spec.limits.default sets the default resource limit
References
- https://kubernetes.io/docs/concepts/configuration/manage-resources-containers
- https://kubernetes.io/docs/tasks/administer-cluster/manage-resources/memory-default-namespace
- https://kubernetes.io/docs/concepts/scheduling-eviction/kube-scheduler
- https://physics.nist.gov/cuu/Units/binary.html
Canary Updates
Note: This only applies to OpenShift
For nodes with extreme HA needs (>=99.9% SLA), one can consider setting them up for canary updates.
This allows an administrator to perform updates on a specific set of nodes within a set maintenance window. Because of this we can also move away pods from the nodes to be updated in a controlled manner.
References
Next Steps
If you want to go to the next step in terms of High Availability that would probably involve some sort of multi/hybrid cloud solution with multiple Kubernetes clusters running in different clouds, maybe even connected with a service mesh.
That is out of scope for this guide but if we ever go down that path in the future then who knows, a part two might show up.
Conclusion
That sums up this guide to High Availability in Kubernetes.
Much of this is based on my personal experience managing Kubernetes for many years, in addition to a lot of best practices found in the official documentation of both OpenShift and Kubernetes.
If you have any feedback, please don't hesitate to send it to me at stian.froystein@intility.
if (wantUpdates == true) {followIntilityOnLinkedIn();}
Other Articles


Platform
June 26, 2026
Beyond Intelligence: Benchmarking Speed and Cost of Self-Hosted vs. Frontier LLMs

Erfan Mohammadi