
Running AI Agents in Automated Workflows: What If Your Documentation Wrote Itself?
Written by
March 5, 2026
|
Approximately a 00 minutes read
Automation
Documentation is one of those things that everyone agrees matters, but is challenging to maintain. Devs are busy, PRs move fast, and updating docs for every change you make rarely feels like the highest priority in the moment. The result is documentation that drifts from the codebase, or simply never gets written in the first place. So we built a flow to automate it.
We have been exploring how AI agents fit into automated workflows in controlled, predictable environments. A use case we think this really shines in is within documentation.
So we built a reusable GitHub Action that (in our case) uses Claude Code to automatically generate documentation based on our internal standards, triggered by pull requests. When a PR is merged, the workflow analyzes the changes and generates updated documentation, which is then pushed out as its own pull request, ready for review.
While this post reflects one way we have been exploring this kind of automation, it is flexible by design. With small changes to the workflow, you can point it at code repos, Docusaurus/MkDocs, or push documentation directly to an internal tool or third-party platform via APIs.
So how does it work?
At a high level, when a team makes changes to a product and those changes get approved, the workflow kicks in automatically. It looks at what changed, uses that as context for an AI agent to update the relevant documentation, and then sends the result off for review before anything gets published. No manual writing, no chasing down what changed.
The keyword here is reusable. Rather than duplicating workflow logic across every repository, you define the workflow once in a central place within your organization, and call it from any code repository that needs it.
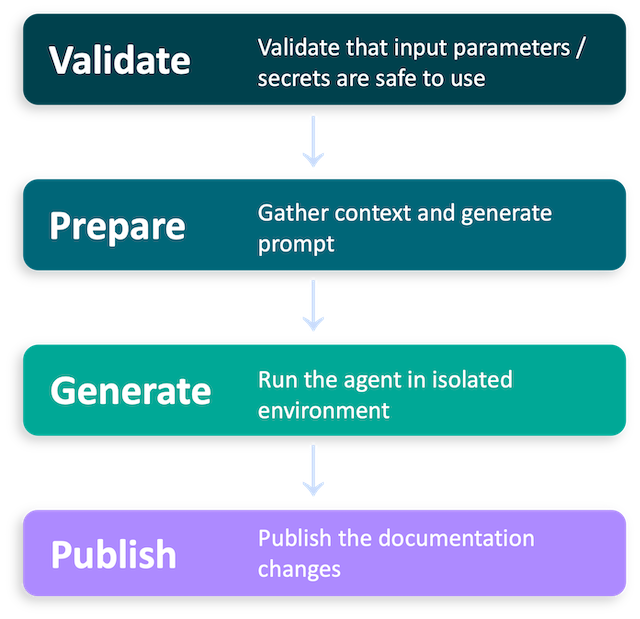
The workflow is built around four jobs: Validate, Prepare, Generate, and Publish. A job in GitHub Actions represents its own isolated, virtualized environment. By splitting the workflow into separate jobs, each step runs in its own clean environment. If any job fails, the chain stops and nothing downstream runs.
The separation keeps concerns isolated, makes failures easy to trace, and as we will get into later, has some useful security implications as well.
Prerequisites
Before we start touching the code, a few things need to be in place. The good news is that most of it only needs to be done once. After that, every repository that calls the workflow picks it up automatically.
A GitHub Repository For The Reusable Workflow
You will need a repository within your GitHub organization to host the workflow. We call ours reusable-claude, and we recommend you do the same. The name is referenced in downstream steps, so keeping it consistent will save you some headaches later.
Another thing before moving on: in the new repo, go to Settings → Actions → Scroll to Access, and set it to "Accessible from repositories in the organization". Skip this and you will get an error when trying to call the workflow from other repos.
A GitHub App
We use a GitHub App for auth. These are scoped to your organization, have granular permissions, and do not belong to any individual user account. To create one, head over to your organization settings and follow the GitHub documentation on creating GitHub Apps. The app will need the following permissions:
- Contents: Read (source repository) and Write (docs repository)
- Pull requests: Read (source repository) and Write (docs repository)
Once created, store the app ID as an organization-level variable called GH_APP_ID and the private key as an organization-level secret called GH_APP_PRIVATE_KEY. Storing them at the organization level means they are automatically available to any repository that calls the workflow. You set it once and forget it.
Microsoft Foundry
We use Foundry to access the Claude models that power the agent. If you do not already have a deployment set up, the Microsoft Foundry documentation covers how to get started. Once you do, create a Claude base model and store the base URL as an organization-level variable called ANTHROPIC_FOUNDRY_BASE_URL , and the API key as an organization-level secret called ANTHROPIC_FOUNDRY_API_KEY.
Metadata
Now that the boring parts are out of the way, let's get our hands dirty with some code.
The file below lives in your reusable-claude repository and is what makes the whole thing tick. The on: workflow_call trigger is what transforms this from a regular workflow into a reusable one, meaning it gets triggered by other workflows rather than by events like pushes or pull requests directly.
name: "Claude Auto Docs"

on:
  workflow_call:
    inputs:
      source_repo:
        description: "Full owner/repo of the source (code) repository, e.g. intility/app-repo"
        type: string
        required: true
      source_pr_id:
        description: "Pull request number in the source repository to generate docs for"
        type: string
        required: true
      docs_repo:
        description: "Full owner/repo of the documentation repository, e.g. intility/docs-repo"
        type: string
        required: true
      system_prompt_path:
        description: "Path (relative to the source repo root) to the system prompt Markdown file."
        type: string
        required: true
      docs_pr_title_prefix:
        description: "Optional prefix prepended to the generated docs PR title, e.g. '[docs]'"
        type: string
        default: "docs:"
      auto_merge:
        description: "When true, the generated docs PR is automatically merged after creation."
        type: boolean
        default: false
      dry_run:
        description: "When true, Claude runs but no files are written and no PR is opened."
        type: boolean
        default: false
    secrets:
      GH_APP_PRIVATE_KEY:
        description: "Private key for the GitHub App used to access the repositories"
        required: true
      ANTHROPIC_FOUNDRY_API_KEY:
        description: "API key for Anthropic Foundry"
        required: true

env:
  TRUSTED_OWNER: [YOUR GITHUB ORG NAME] # in our case this would be "intility"
Under that, we define the inputs. There are four required ones: the source repository (where your code lives), the pull request ID to be documented, the docs repository (where the output should go), and a path to a system prompt file that tells the agent how to write documentation your way.
Then we have a few optional knobs to turn. You can customize the PR title prefix, toggle auto-merge if you trust the output enough to skip review, and specify dry-run mode if you want to see what the agent would do without actually committing anything. We will come back to those last two when we get to the Publish job.
Job 1: Validate
The first job to run is Validate. It is intentionally kept simple and is very much open for extension as your needs grow.
jobs:
  validate:
    if: github.event.sender.type != 'Bot' && !endsWith(github.event.sender.login, '[bot]')
    runs-on: ubuntu-latest
    outputs:
      owner: ${{ steps.parse-repos.outputs.owner }}
      source_name: ${{ steps.parse-repos.outputs.source_name }}
      docs_name: ${{ steps.parse-repos.outputs.docs_name }}
    steps:
      - name: Parse repo names
        id: parse-repos
        env:
          SOURCE_REPO: ${{ inputs.source_repo }}
          DOCS_REPO: ${{ inputs.docs_repo }}
        run: |
          echo "owner=${SOURCE_REPO%%/*}"      >> "$GITHUB_OUTPUT"
          echo "source_name=${SOURCE_REPO##*/}" >> "$GITHUB_OUTPUT"
          echo "docs_owner=${DOCS_REPO%%/*}"    >> "$GITHUB_OUTPUT"
          echo "docs_name=${DOCS_REPO##*/}"     >> "$GITHUB_OUTPUT"

      - name: Validate that both source and docs repos are within o controlled env
        env:
          SOURCE_OWNER: ${{ steps.parse-repos.outputs.owner }}
          DOCS_OWNER: ${{ steps.parse-repos.outputs.docs_owner }}
        run: |
          if [ "$SOURCE_OWNER" != "$TRUSTED_OWNER" ]; then
            echo "::error::Invalid source_repo owner '$SOURCE_OWNER'. Expected '$TRUSTED_OWNER'."
            exit 1
          fi
          if [ "$DOCS_OWNER" != "$TRUSTED_OWNER" ]; then
            echo "::error::Invalid docs_repo owner '$DOCS_OWNER'. Expected '$TRUSTED_OWNER'."
            exit 1
          fi

      - name: Validate secrets
        env:
          PRIVATE_KEY: ${{ secrets.GH_APP_PRIVATE_KEY }}
          FOUNDRY_API_KEY: ${{ secrets.ANTHROPIC_FOUNDRY_API_KEY }}
        run: |
          if [ -z "$PRIVATE_KEY" ]; then
            echo "::error::GH_APP_PRIVATE_KEY secret is not set"
            exit 1
          fi
          if [ -z "$FOUNDRY_API_KEY" ]; then
            echo "::error::ANTHROPIC_FOUNDRY_API_KEY secret is not set"
            exit 1
          fi
It does two things. First, we check that both the source and docs repositories belong to our organization. This is a safeguard so the workflow never accidentally pulls context from or writes to repositories outside of our controlled environment. Second, it verifies that the required secrets are actually present before anything else runs. No point in getting three jobs deep only to fail on a missing API key.
Job 2: Prepare
This is the crème de la crème of the entire workflow. Before we let the agent loose, we need to give it all the information it needs to do its job well.
  prepare:
    name: "Gather context and prepare prompt"
    needs: validate
    runs-on: ubuntu-latest
    permissions:
      contents: read
      pull-requests: read
    outputs:
      source_pr_title: ${{ steps.fetch-diff.outputs.source_pr_title }}
      app_slug: ${{ steps.app-token.outputs.app-slug }}
    steps:
      - name: Generate GitHub App Token
        id: app-token
        uses: actions/create-github-app-token@v2
        with:
          app-id: ${{ vars.GH_APP_ID }}
          private-key: ${{ secrets.GH_APP_PRIVATE_KEY }}
          owner: ${{ needs.validate.outputs.owner }}
          repositories: ${{ needs.validate.outputs.source_name }},${{ needs.validate.outputs.docs_name }}
          permission-contents: read
          permission-pull-requests: read

      - name: Fetch PR diff and metadata
        id: fetch-diff
        env:
          GH_TOKEN: ${{ steps.app-token.outputs.token }}
          SOURCE_REPO: ${{ inputs.source_repo }}
          SOURCE_PR_ID: ${{ inputs.source_pr_id }}
        run: |
          gh pr diff "$SOURCE_PR_ID" --repo "$SOURCE_REPO" > pr.diff
          gh pr view "$SOURCE_PR_ID" --repo "$SOURCE_REPO" \
            --json number,title,body,labels,author,baseRefName,headRefName \
            > pr-metadata.json
          echo "Diff size: $(wc -c < pr.diff) bytes"

          SOURCE_PR_TITLE=$(jq -r '.title' pr-metadata.json)
          echo "source_pr_title=${SOURCE_PR_TITLE}" >> "$GITHUB_OUTPUT"

      - name: Compute source repo sparse-checkout paths
        id: sparse-paths
        env:
          SYSTEM_PROMPT_PATH: ${{ inputs.system_prompt_path }}
        run: |
          CHANGED_FILES=$(grep -oP '^\+\+\+ b/\K.*' pr.diff | sort -u || true)
          {
            echo "paths<<EOF"
            echo "$SYSTEM_PROMPT_PATH"
            if [ -n "$CHANGED_FILES" ]; then
              echo "$CHANGED_FILES"
            fi
            echo "EOF"
          } >> "$GITHUB_OUTPUT"

      - name: Checkout source repository
        uses: actions/checkout@v6
        with:
          repository: ${{ inputs.source_repo }}
          token: ${{ steps.app-token.outputs.token }}
          sparse-checkout: ${{ steps.sparse-paths.outputs.paths }}
          sparse-checkout-cone-mode: false
          path: source-repo

      - name: Checkout docs repository
        uses: actions/checkout@v6
        with:
          repository: ${{ inputs.docs_repo }}
          token: ${{ steps.app-token.outputs.token }}
          fetch-depth: 1
          path: docs-repo

      - name: Prepare prompt
        env:
          SOURCE_REPO: ${{ inputs.source_repo }}
          SOURCE_PR_ID: ${{ inputs.source_pr_id }}
          DOCS_REPO: ${{ inputs.docs_repo }}
          SYSTEM_PROMPT_PATH: ${{ inputs.system_prompt_path }}
        run: |
          PROMPT_FILE="source-repo/${SYSTEM_PROMPT_PATH}"
          if [ ! -f "$PROMPT_FILE" ]; then
            echo "::error::System prompt file not found at '${PROMPT_FILE}'."
            echo "::error::Create '${SYSTEM_PROMPT_PATH}' in your source repository."
            exit 1
          fi

          export SOURCE_REPO SOURCE_PR_ID DOCS_REPO
          SYSTEM_PROMPT=$(envsubst < "$PROMPT_FILE")

          cat > prompt.md <<PROMPT_EOF
          ${SYSTEM_PROMPT}

          ## Context

          Source repository: ${SOURCE_REPO}
          Source PR: #${SOURCE_PR_ID}
          Documentation repository: ${DOCS_REPO}

          ## PR Metadata

          Read the PR metadata from ./pr-metadata.json

          ## PR Diff

          Read the PR diff from ./pr.diff — this file may be large. If reading fails due to size, use the offset and limit parameters to read it in chunks (e.g. lines 1-2000, then 2001-4000, etc.).

          ## Source Code

          The source files touched by this PR are available under ./source-repo/ for additional context. Use these to understand the broader codebase context around the changes when writing documentation.

          ## Instructions

          1. Read ./pr-metadata.json and ./pr.diff to understand the changes
          2. Read relevant source files under ./source-repo/ for broader context around the changed code
          3. Read the existing documentation structure under ./docs-repo/
          4. Based on the diff, metadata, and the guidelines above, write the necessary documentation changes directly to ./docs-repo/
          5. Do NOT commit, push, or create any PRs — that is handled separately.
          6. ONLY update files under ./docs-repo/ — do NOT write files anywhere else in the workspace.
          7. ONLY update the acual documentation files that need to be changed based on the PR diff and metadata. Do NOT make any unrelated changes.
          PROMPT_EOF

      - name: Package source repo without .git folder
        run: tar -cf source-repo.tar --exclude=.git -C source-repo .

      - name: Package docs repo without .git folder
        run: tar -cf docs-repo.tar --exclude=.git -C docs-repo .

      - name: Upload context artifact
        uses: actions/upload-artifact@v4
        with:
          name: claude-context
          path: |
            prompt.md
            pr.diff
            pr-metadata.json
            source-repo.tar
            docs-repo.tar
          retention-days: 1
This job is responsible for gathering all the context the agent will need and package it up into a single artifact. It starts by fetching the PR diff and metadata from the source repository. Then it checks out the files touched by the pull request. After that it pulls down the existing documentation from the docs repository, and lastly loads the custom system prompt you have defined for your project. From all of that, it builds a single prompt and bundles everything together.
The reason this lives in its own job is intentional. By preparing all the context here and passing it forward as an artifact, we can hand it off to the agent in a completely clean and isolated environment. The Generate job gets exactly what it needs and nothing more.
Job 3: Generate
With all the context packaged up and ready, it is time to hand things over to the agent.
The Generate job runs Claude in a completely isolated environment. It has no access to secrets, no repository permissions, and no network calls to GitHub. It downloads the artifact from the Prepare job, runs the agent with the prompt and context we built, and when it is done, uploads the resulting documentation changes as a new artifact. That is the only way anything leaves this job.
  generate:
    name: "Run Claude to generate docs changes"
    needs: [validate, prepare]
    runs-on: ubuntu-latest
    concurrency:
      group: claude-auto-docs-${{ inputs.source_repo }}-${{ inputs.source_pr_id }}
      cancel-in-progress: true
    permissions:
      id-token: write
    outputs:
      has_changes: ${{ steps.check-changes.outputs.has_changes }}

    steps:
      - name: Download context artifact
        uses: actions/download-artifact@v4
        with:
          name: claude-context

      - name: Extract docs repo
        run: mkdir docs-repo && tar -xf docs-repo.tar -C docs-repo

      - name: Extract source repo
        run: mkdir source-repo && tar -xf source-repo.tar -C source-repo

      - name: Initialize docs-repo git baseline for change detection
        run: |
          git -C docs-repo init
          git -C docs-repo add -A
          git -C docs-repo -c user.name="baseline" -c user.email="baseline@localhost" commit -m "baseline" --allow-empty

      - name: Read prompt
        id: read-prompt
        run: |
          {
            echo "prompt<<PROMPT_DELIM"
            cat prompt.md
            echo "PROMPT_DELIM"
          } >> "$GITHUB_OUTPUT"

      - name: Initialize git repo for claude-code-action
        run: git init

      - name: Run Claude Code
        id: claude-docs
        uses: anthropics/claude-code-action@12cace9e292e4ab59b8c807c20a79ec673fabf7c # v1.0.30
        env:
          ANTHROPIC_FOUNDRY_BASE_URL: ${{ vars.ANTHROPIC_FOUNDRY_BASE_URL }}
          ANTHROPIC_FOUNDRY_API_KEY: ${{ secrets.ANTHROPIC_FOUNDRY_API_KEY }}
        with:
          use_foundry: "true"
          github_token: ${{ github.token }}
          bot_id: ${{ vars.GH_APP_ID }}
          bot_name: ${{ needs.prepare.outputs.app_slug }}
          prompt: ${{ steps.read-prompt.outputs.prompt }}
          claude_args: >-
            --allowed-tools
            "Read,Write,Edit,Glob,Grep,Bash(ls:*),Bash(find:*)"

      - name: Upload Claude session logs
        if: always()
        uses: actions/upload-artifact@v4
        with:
          name: claude-session-logs-${{ github.run_id }}
          path: ${{ steps.claude-docs.outputs.execution_file }}
          retention-days: 7

      - name: Check for changes and create patch
        id: check-changes
        run: |
          cd docs-repo
          git add -A
          if git diff --cached --quiet; then
            echo "has_changes=false" >> "$GITHUB_OUTPUT"
            echo "No changes detected."
          else
            echo "has_changes=true" >> "$GITHUB_OUTPUT"
            echo "Changes detected:"
            git diff --cached --stat
            git diff --cached --binary > "$GITHUB_WORKSPACE/docs-changes.patch"
          fi

      - name: Upload patch
        if: steps.check-changes.outputs.has_changes == 'true'
        uses: actions/upload-artifact@v4
        with:
          name: docs-patch
          path: docs-changes.patch
          retention-days: 7
A couple of things worth noting here. The concurrency block ensures that only one documentation run can happen at a time per repository and pull request, so you never end up with two agents stepping on each other. We also upload the Claude session logs as an artifact on every run, which comes in handy when you want to understand exactly what the agent did and why.
Job 4: Publish
The last job to run is the publish step. This is where everything comes together.
It picks up the patch artifact from the Generate job, applies it to the docs repository, and opens a pull request for review.
  publish:
    name: "Publish docs changes by creating PR"
    needs: [validate, prepare, generate]
    if: needs.generate.outputs.has_changes == 'true' && !inputs.dry_run
    runs-on: ubuntu-latest
    permissions:
      contents: write
      pull-requests: write
    steps:
      - name: Generate GitHub App Token for docs repo
        id: app-token
        uses: actions/create-github-app-token@v2
        with:
          app-id: ${{ vars.GH_APP_ID }}
          private-key: ${{ secrets.GH_APP_PRIVATE_KEY }}
          owner: ${{ needs.validate.outputs.owner }}
          repositories: ${{ needs.validate.outputs.docs_name }}

      - name: Checkout docs repository
        uses: actions/checkout@v6
        with:
          repository: ${{ inputs.docs_repo }}
          token: ${{ steps.app-token.outputs.token }}
          fetch-depth: 0
          path: docs-repo

      - name: Download patch
        uses: actions/download-artifact@v4
        with:
          name: docs-patch

      - name: Validate and apply patch from Claude
        run: |
          PATCH="$GITHUB_WORKSPACE/docs-changes.patch"

          # Reject patches that touch sensitive paths (e.g. workflow injection via crafted PR)
          if grep -qP '^\+\+\+ b/\.github/' "$PATCH"; then
            echo "::error::Patch modifies disallowed path (.github/)"
            exit 1
          fi

          git -C docs-repo apply --check "$PATCH"
          git -C docs-repo apply "$PATCH"

      - name: Commit and open PR
        id: create-pr
        env:
          GH_TOKEN: ${{ steps.app-token.outputs.token }}
          SOURCE_REPO: ${{ inputs.source_repo }}
          SOURCE_PR_ID: ${{ inputs.source_pr_id }}
          DOCS_REPO: ${{ inputs.docs_repo }}
          PR_TITLE_PREFIX: ${{ inputs.docs_pr_title_prefix }}
          APP_SLUG: ${{ steps.app-token.outputs.app-slug }}
          GH_APP_ID: ${{ vars.GH_APP_ID }}
        run: |
          cd docs-repo

          git config user.name  "${APP_SLUG}[bot]"
          git config user.email "${GH_APP_ID}+${APP_SLUG}[bot]@users.noreply.github.com"

          DEFAULT_BRANCH=$(git remote show origin | sed -n 's/.*HEAD branch: //p')
          BRANCH="claude-docs/pr-${SOURCE_PR_ID}-$(date +%Y%m%d%H%M%S)"
          git checkout -b "$BRANCH"

          TITLE="${PR_TITLE_PREFIX} auto-generated docs for ${SOURCE_REPO}#${SOURCE_PR_ID}"

          git add -A
          git commit -m "$(cat <<COMMIT_EOF
          ${TITLE}

          Generated by Claude Auto Docs workflow.
          Source PR: https://github.com/${SOURCE_REPO}/pull/${SOURCE_PR_ID}
          COMMIT_EOF
          )"

          git push origin "$BRANCH"

          PR_BODY=$(cat <<'BODY_EOF'
          ## Auto-generated Documentation

          This PR was generated automatically by the Claude Auto Docs workflow.
          BODY_EOF
          )
          PR_BODY="${PR_BODY}

          **Source repository:** \`${SOURCE_REPO}\`
          **Source PR:** https://github.com/${SOURCE_REPO}/pull/${SOURCE_PR_ID}

          > **Note**
          > Review all generated content carefully before merging."

          DOCS_PR_URL=$(gh pr create \
            --repo "$DOCS_REPO" \
            --base "$DEFAULT_BRANCH" \
            --head "$BRANCH" \
            --title "$TITLE" \
            --body "$PR_BODY")

          echo "Docs PR created: $DOCS_PR_URL"
          echo "docs_pr_url=$DOCS_PR_URL" >> "$GITHUB_OUTPUT"

      - name: Auto-merge docs PR
        if: inputs.auto_merge
        env:
          GH_TOKEN: ${{ steps.app-token.outputs.token }}
          DOCS_PR_URL: ${{ steps.create-pr.outputs.docs_pr_url }}
          DOCS_REPO: ${{ inputs.docs_repo }}
        run: |
          echo "Auto-merging docs PR: $DOCS_PR_URL"
          gh pr merge "$DOCS_PR_URL" --repo "$DOCS_REPO" --squash --delete-branch
As mentioned earlier, this step is really just a starting point. With a few changes you could push the output to whatever fits your setup.
And that is the entire workflow. A few hundred lines of YAML, and documentation is no longer something your organization has to think about.
How would you use it?
With the reusable workflow in place, adding automatic documentation to any repository is straightforward. Add the following file to any repository you want to document:
name: Claude Code - Auto Documentation

on:
  pull_request:
    types: [closed]
    branches: [main]

jobs:
  auto-doc:
    if: github.event.pull_request.merged == true
    permissions:
      contents: write
      pull-requests: write
      id-token: write
    secrets:
      GH_APP_PRIVATE_KEY: ${{ secrets.GH_APP_PRIVATE_KEY }}
      ANTHROPIC_FOUNDRY_API_KEY: ${{ secrets.ANTHROPIC_FOUNDRY_API_KEY }}
    uses: [YOUR GITHUB ORG NAME]/reusable-claude/.github/workflows/claude-auto-docs.yml@main
    with:
      source_repo: ${{ github.repository }}
      source_pr_id: ${{ github.event.pull_request.number }}
      docs_repo: [YOUR GITHUB ORG NAME]/[YOUR DOCS REPOSITORY NAME]
system_prompt_path: ".github/claude-docs-system-prompt.md"Lastly, create a system prompt file to customize how the agent writes documentation for your specific style and standards. Here is a small example to get you started:
# Documentation System Prompt

  You are a documentation agent. Your task is to generate and update
  documentation based on code changes introduced in pull requests.

  ## Writing Style

  - Write in a clear, concise, and professional tone
  - Use active voice and present tense
  - Avoid jargon unless it is standard terminology for the target
  audience
  - Structure content with headings, subheadings, and lists for
  scannability

  ## Document Structure

  Each document should follow this general structure:

  1. **Title** — A short, descriptive name for the module or feature
  2. **Overview** — A brief summary of what it does and why it exists
  3. **Usage** — How to use it, including code examples or
  configuration snippets where applicable
  4. **Parameters / Inputs** — A table or list describing each
  parameter, its type, default value, and purpose
  5. **Outputs** — What the module or feature produces or returns
  6. **Examples** — At least one practical example showing real-world
   usage

  ## Guidelines

  - Only document what exists in the code. Do not speculate or invent
   features.
  - When updating existing documentation, preserve sections that are
  still accurate and only modify what has changed.
  - If a breaking change is introduced, call it out explicitly.
  - Keep examples minimal but functional — they should be
  copy-pasteable.
  - Use fenced code blocks with appropriate language tags for all
  code snippets.
Merge both files to your main branch. From this point on, every merged pull request will trigger the workflow automatically.
Security Considerations
When you give an agentic workflow the ability to read your code and write to your repositories, it is worth taking a moment to think about the security implications. Here are some of the things we thought about:
- Running the agent in its own isolated job. By keeping the Generate job separate from everything else, we control exactly what context the agent has access to through artifacts. It does not inherit secrets or permissions it does not need, and if something unexpected happens, the blast radius is limited to that job alone.
- We recommend scoping the GitHub App as narrowly as possible. Rather than giving it broad access across the organization, you should limit it to only the repositories it actually needs to read from and write to. A tightly scoped app means a tightly scoped problem if something goes wrong.
- Human-in-the-loop for the publish step. By default, the workflow opens a pull request in the documentation repository rather than merging directly. This gives us a chance to review what the agent produced before it reaches production. You can set auto_merge: true to skip that step, but we kept the default on while we were building trust in the output. We recommend doing the same.
Closing Thoughts
And voilà, there you have it. A little work to set up the initial workflow, but you now have a way to automatically generate documentation for anything your heart desires.
if (wantUpdates == true) {followIntilityOnLinkedIn();}
Other Articles


Platform
June 26, 2026
Beyond Intelligence: Benchmarking Speed and Cost of Self-Hosted vs. Frontier LLMs

Erfan Mohammadi